🚀 In addition to walking you through a simple example step by step, I'll show you how to handle errors gracefully and display the results directly in a browser (end of this tutorial). This tutorial is perfect for beginners looking to build practical, real world Node.js applications with clean and modern JavaScript.
Note: This tutorial assumes that Node.js is already installed on your computer. If it's not, you'll need to install it first from nodejs.org before proceeding.
But first, do this:
1) Press window + R buttons to open the run window. Type cmd and hit the Enter button to open the "command" window.
2) Run node -v to check the current version of "Node.js".
node -v
3) Create a new folder where you want to run the project. For example, mkdir nodejs. Navagate (or move) to the newly created folder: cd D:\arun\nodejs.
The XML File
Start by creating a new XML file named list_of_birds.xml and save it in your project folder. Inside the file, add a few sample <Bird> nodes using the structure shown below:
<List>
    <Bird name="Bald Eagle" id="001">
      <type>Hawk</type>
    </Bird>
    <Bird name="Cooper's Hawk" id="002">
      <type>Hawk</type>
    </Bird>
    <Bird name="Mourning Dove" id="003">
      <type>Dove</type>
    </Bird>
    <Bird name="Black Vulture" id="004">
      <type>Hawk</type>
    </Bird>
    <Bird name="Cassin's Sparrow" id="005">
      <type>Sparrow</type>
    </Bird>
</List>
Read a File with async/await in Node.js
To read a file using async/await in Node.js, you'll can use the fs/promises module, which provides promise based file system methods.
Inside the project folder, create a file named read-file-using-async-await.js. Write the below code in the file.
const fs = require('fs/promises');     // Import the fs/promises module.

async function readFileAsync() {
    try {
      const data = await fs.readFile('list_of_birds.xml', 'utf8');
        console.log(data); // Output the file contents.
    } catch (err) {
        console.error('Error reading file:', err);
    }
}

readFileAsync();
Run the script
node read-file-using-async-await.js
The above Node.js script show how to read an XML file asynchronously using async/await syntax. It begins by importing the "fs/promises" module, which provides promise based methods for interacting with the file system. The readFileAsync function reads the contents of a file named "list_of_birds.xml" using fs.readFile with 'utf8' encoding to ensure the data is returned as a readable string.
When executed, the script outputs the raw XML data to the console exactly as it appears in the file, complete with all nodes, attributes, and structure. This is useful for verifying the XML format before parsing or processing it further. If the file is missing or unreadable, the error is caught and logged. This approach is ideal for beginners learning how to handle file I/O in Node.js while working with structured data formats like XML.
Pretty straightforward, right? Now let's kick things up a notch and take it to the next level.
Read XML file, Parse it, and Extract Individual Nodes
Taking the previous example a step further. This updated script reads the XML file, parses its contents into a JavaScript object, and extracts each <Bird> node, displaying both its attributes and child elements using the powerful xml2js library.
Note: I have explained about xml2js library below.
1: Install xml2js
First, install the XML parser.
npm install xml2js
2: Read XML File
Create a new file in the project folder and write the code in it.
const fs = require('fs/promises');
const xml2js = require('xml2js');

const parser = new xml2js.Parser({ explicitArray: false });

async function readBirdsXML() {
    try {
        const xmlData = await fs.readFile('list_of_birds.xml', 'utf8');
        const result = await parser.parseStringPromise(xmlData);

        console.log('✅ XML Parsed Successfully!\n');

        const birds = result.List.Bird;

        // Store birds is an array.
        const birdArray = Array.isArray(birds) ? birds : [birds];

        // Show the data.
        birdArray.forEach((bird, index) => {
            const name = bird.$.name;
            const id = bird.$.id;
            const type = bird.type;

            console.log(`Bird ${index + 1}`);
            console.log(`Name: ${name}`);
            console.log(`ID: ${id}`);
            console.log(`Type: ${type}`);
            console.log('---');
        });

    } catch (err) {
        console.error('❌ Error reading or parsing XML:', err.message);
    }
}

readBirdsXML();
Run the code.
node read-file-using-async-await.js
Here's what the code does.
Reads the XML file (list_of_birds.xml) asynchronously using fs/promises. Next, it parses the XML into a JavaScript object using the xml2js library.
It extracts each <Bird> node from the <List> root element, by accessing attributes like name and id using bird.$.
It reads child elements like <type> directly and prints each bird's details (name, ID, type) in a clean, readable format.
D:\arun\nodejs>node read-file-using-async-await.js
✅ XML Parsed Successfully!
Bird 1
Name: Bald Eagle
ID: 001
Type: Hawk
---
Bird 2
Name: Cooper's Hawk
ID: 002
Type: Hawk
---
Bird 3
Name: Mourning Dove
ID: 003
Type: Dove
...
What Is xml2js?
xml2js is a popular Node.js library that converts XML data into JavaScript objects. It simplifies the process of parsing XML, making it easy to work with structured data in a format that's familiar to JavaScript developers.
Read more about xml2js on npm.
Key Features of xml2js
Easy Parsing: Converts XML into plain JavaScript objects with minimal setup.
Attribute Support: Extracts XML attributes using the $ symbol.
Custom Options: It offers configuration like explicitArray, mergeAttrs, and ignoreAttrs to control how XML is parsed.
Bi-directional Conversion: Can also "convert JavaScript objects back into XML" using xml2js.Builder.
How to Display Parsed XML Data in the Browser
You might be wondering: since the code converts XML into a JavaScript object (refer to the example above), can we display that result in a browser? The answer is absolutely yes 👍. Once the XML is parsed using the "xml2js" library, the resulting JavaScript object can be sent to the browser and rendered in any format you like, whether it's a clean HTML table, a dynamic list, or a fully interactive UI. This opens the door to building user friendly interfaces that bring structured XML data to life.
This is how it Works.
Server Side:
• Use fs/promises to read the XML file.
• Use xml2js to convert the XML into a JavaScript object.
• Send the parsed object to the browser via an API or template engine.
The Client (Browser):
• Receive the JavaScript object (e.g., via fetch() or AJAX).
• Use DOM manipulation to display the data dynamically.
Example:
Follow these steps.
I am assuming, you have already installed node.js in your computer. You can check by running:
node -v
1) Install xml2js (if you haven't)
npm install xml2js
2) Install Express
Express is a lightweight and flexible Node.js framework used to build web servers and APIs. In this project, it serves as the backend engine that reads the XML file, parses it, and sends the processed data to the browser, making it easy to display and interact with the content on the frontend.
Install the Express framework like this:
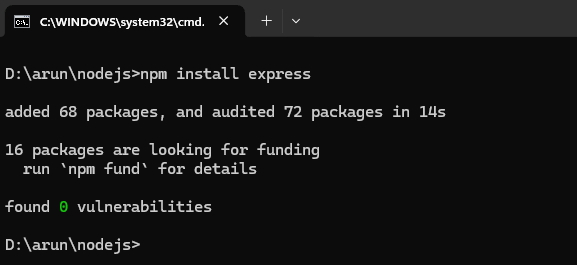
npm install express

3) Install the cors middleware
npm install cors
To prevent a CORS (Cross-Origin Resource Sharing) error when accessing data from the browser, you need to configure your server to allow "cross-origin" requests. This error typically occurs when your frontend tries to communicate with a backend running on a different origin, like a separate port or domain and the server hasn't explicitly permitted that interaction. By enabling CORS on your Node.js server, you ensure the browser doesn’t block these requests, allowing smooth data exchange between your frontend and backend.
4) Create Server File
Create a file named server.js (or index.js) in the project folder and add your Express code.
👉 Make sure "list_of_birds.xml" is in the same project folder where you have created the server.
const express = require('express');
const cors = require('cors');
const fs = require('fs/promises');
const xml2js = require('xml2js');

const app = express();
const PORT = 3000;

app.use(cors());  // Enable CORS for all routes.

app.get('http://localhost:3000/birds', async (req, res) => {
    try {
        const xml = await fs.readFile('list_of_birds.xml', 'utf8');
        const result = await new xml2js.Parser({ explicitArray: false }).parseStringPromise(xml);
        res.json(result.List.Bird);
    } catch (err) {
        res.status(500).send('Error reading XML file');
    }
});

app.listen(PORT, () => {
    console.log(`Server running at http://localhost:${PORT}`);
});
5) Run the Server
In your terminal, run:
node server.js
You should see this in the terminal:
D:\arun\nodejs>node server.js
Server running at http://localhost:3000
Open your browser and type:
http://localhost:3000/birds
You'll see the parsed XML data as JSON. Make few changes in the XML file and the refresh the browser, to confirm if its actually reading (parsing) the XML file properly.
6) Display in Browser
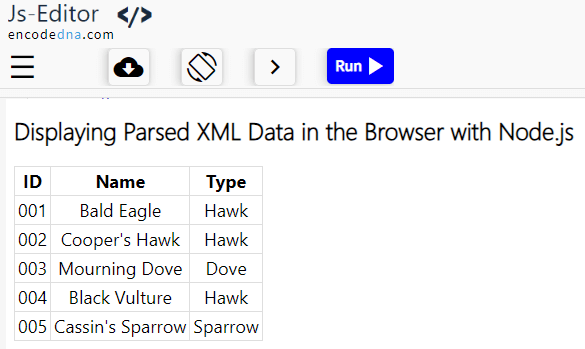
🚀 Great! Now it's time to bring your XML data to life. Let's display it in the browser and render it as a clean, structured HTML table.
<!DOCTYPE html>
<html lang="en">
<head>
  <style type="text/css">
    th, td, p, input {
      font-size: 18px;
    }

    table, th, td {
      border: solid 1px #ddd;
      border-collapse: collapse;
      padding: 2px 3px;
      text-align: center;
    }
    th {
      font-weight:bold;
    }
  </style>
</head>
  <body>
    <main>
      <table id="birdTable" class="edTable">
        <thead>
          <tr>
            <th>ID</th>
            <th>Name</th>
            <th>Type</th>
          </tr>
        </thead>
        <tbody></tbody>
      </table>
    </main>
  </body>
<script>
    async function loadBirds() {
      const response = await fetch('http://localhost:3000/birds');
      const birds = await response.json();

      const tbody = document.querySelector('#birdTable tbody');
        birds.forEach(bird => {
          const row = document.createElement('tr');
          row.innerHTML = `
            <td>${bird.$.id}</td>
            <td>${bird.$.name}</td>
            <td>${bird.type}</td>
          `;
          tbody.appendChild(row);
      });
    }

    loadBirds();
</script>
</html>
That's it! If everything is set up correctly, you'll see the parsed XML data rendered as a neatly structured HTML table like this:

