Last updated: 14th October 2025
XML has been a cornerstone of web development for decades, valued for its simplicity, readability, and ease of integration. Originally designed to structure and transport data across web pages, XML remains a lightweight and widely adopted format for sharing information online.In this post, we'll explore two different approaches to extracting data from an XML file using plain JavaScript: the traditional XMLHttpRequest method and the modern Fetch API. Whether you're maintaining legacy code or building something new, understanding both techniques will give you a solid foundation for working with XML in the browser.
👉 Do you know you can extract or read data from an external XML file using jQuery Ajax? Check out this article.
What is XML
XML is a markup language designed to store and transport structured data. Its format is self-descriptive, meaning you can often understand the type of data it contains just by looking at it. However, to read and extract data from an XML file programmatically, you'll need a language like JavaScript or a library such as jQuery to parse and manipulate its contents.
The XML File
First, have a look at the XML file here... library.xml. I am going to use the data in the file in my example here.
The file has a list of Books, put together using XML attributes, tags and nested tags.
Note: The tags are case sensitive and you should use it carefully in your program.
You can open file to view it. Copy the contents of the file and save it in your computer and name it as library.xml, because I am using the same file name in my example here. You can change the name of the file according to your choice later.
Displaying XML Data with HTML and JavaScript
Once the XML file (also known as an XML document) is created, the next step is to write a JavaScript script that reads and extracts data from it. To present this data on the web page, I chose to use the HTML <div> element, a lightweight and flexible container that's ideal for dynamically displaying structured content like XML. This approach keeps the layout simple while allowing for easy styling and manipulation
1) First Example: Using XMLHttpRequest to Read XML

<head>
    <style>
        #books { overflow: hidden; }
        #books div { width: 50%; }

        .col1 { float: left; clear: both; }
        .col2 { float:right; }
    </style>
</head>
<body>
    <div id="books"></div>
</body>

<script>
  let fetchLibrary = () => {
    const oXHR = window.XMLHttpRequest ? new XMLHttpRequest() :
    new ActiveXObject('Microsoft.XMLHTTP');

    function reportStatus() {
      if (oXHR.readyState == 4) {    // request completed
        showTheList(this.responseXML);  // Now show the data
      }
    }

    oXHR.onreadystatechange = reportStatus;
    oXHR.open("GET", "../../library/library.xml", true); // true = asynchronous request (desirable), false = synchronous request.
    oXHR.send();
  }

  let showTheList = (xml) => {
    const divBooks = document.getElementById('books');  // parent element.
    const book_List = xml.getElementsByTagName('List'); // the xml tag name

    for (let i = 0; i < book_List.length; i++) {
      // Create child DIVs inside parent DIV.
      let divLeft = document.createElement('div');
      divLeft.className = 'col1';
      divLeft.textContent = book_List[i].getElementsByTagName("BookName")[0].childNodes[0].nodeValue;

      let divRight = document.createElement('div');
      divRight.className = 'col2';
      divRight.textContent = book_List[i].getElementsByTagName("Category")[0].childNodes[0].nodeValue;

      // add child to parent.
      divBooks.appendChild(divLeft);
      divBooks.appendChild(divRight);
    }
  };

  fetchLibrary();
</script>🚀 Related Example: How to import XML from URL into Google Sheet using Custom Format?
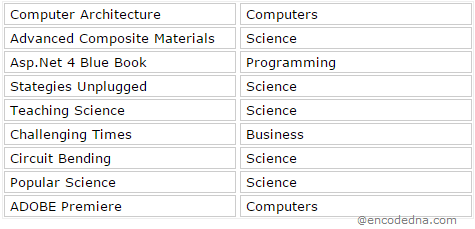
Here's the output of the first example.

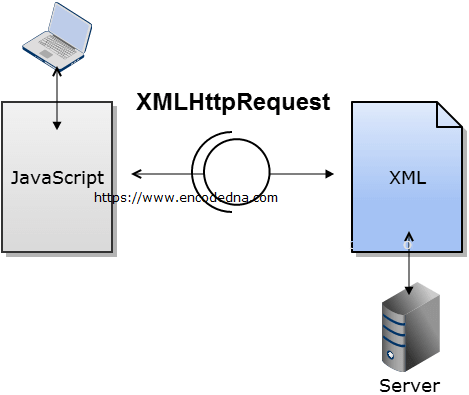
Once the web page loads, it initiates an HTTP request to retrieve the XML file. This is accomplished using the XMLHttpRequest object, which allows us to send the request, handle the response, and extract the XML data for further processing.
The XMLHttpRequest Object
Introduced in the early 2000s, the XMLHttpRequest object is a foundational component of Ajax (Asynchronous JavaScript and XML), enabling web pages to communicate with servers without reloading the entire page. It allows developers to send and receive data over HTTP, making it possible to fetch XML files, or any type of data, from a web server dynamically.
While most commonly used with client-side languages like JavaScript and JScript, XMLHttpRequest can also be integrated into server-side environments. Its versatility makes it useful for transferring, retrieving, and manipulating data from various sources, helping create more responsive and interactive web applications.
onreadystatechange Property
The onreadystatechange property is used to assign or retrieve the event handler that monitors changes in the state of an asynchronous request. It plays a crucial role in tracking the progress of an XMLHttpRequest, allowing developers to execute specific actions when the request reaches different stages, especially when it's fully completed (readyState === 4).
This property was first introduced in Internet Explorer 7 and has since become a standard feature in handling asynchronous communication in web applications.
The readyState property of the XMLHttpRequest object indicates the current status of the request's lifecycle. It reflects the progress of the request, from initialization to completion. By monitoring this property, developers can determine when the response is ready to be processed.
Values of readyState Property
State
0
1
2
3
4
Description
Uninitialized. Not yet initialized, but an object is created.
The request has been setup. The object is created, send method not yet called.
We have sent a request.
The sent request is still in process.
The request is complete and ready to process further.
The open() Method
To begin an HTTP request using the XMLHttpRequest object, we first initialize it with the open() method. This method configures the request by specifying key details such as the HTTP method (e.g., GET or POST), the URL of the resource, and whether the request should be asynchronous.
Syntax
open ( Method, URL, Asynchronous, UserName, Password )
👉 You can read more about the open() method here.
The send() Method
The send() method is used to dispatch the HTTP request that has been configured using the open() method. It initiates communication with the server and begins the process of retrieving or submitting data.
This method accepts a single optional parameter, data, which is typically used when sending information to the server (e.g., in a POST request). In the above example, since we're simply retrieving an XML file using a GET request, no data needs to be sent, so we call send() without any arguments.
Syntax
send ( data )
2) Second Example: Read XML using fetch API in JavaScript
You can modernize the above code by replacing the legacy XMLHttpRequest with the fetch API, which is more readable and promise based.
Note: It is an improved version of the above (first) example. Therefore, the Markup (or the HTML) remains the same. The script uses async/await method.
<script>
    const fetchLibrary = async () => {
      try {
        const response = await fetch("../../library/library.xml");
        if (!response.ok) {
          throw new Error(`HTTP error! Status: ${response.status}`);
        }

        const xmlText = await response.text();
        const parser = new DOMParser();
        const xmlDoc = parser.parseFromString(xmlText, "application/xml");

        showTheList(xmlDoc);
      } catch (error) {
        console.error("Failed to fetch library:", error);
      }
    };

    const showTheList = (xml) => {
      const divBooks = document.getElementById('books');
      const book_List = xml.getElementsByTagName('List');

      for (let i = 0; i < book_List.length; i++) {
        const bookName = book_List[i].getElementsByTagName("BookName")[0]?.textContent || "Unknown";
        const category = book_List[i].getElementsByTagName("Category")[0]?.textContent || "Uncategorized";

        const divLeft = document.createElement('div');
        divLeft.className = 'col1';
        divLeft.textContent = bookName;

        const divRight = document.createElement('div');
        divRight.className = 'col2';
        divRight.textContent = category;

        divBooks.appendChild(divLeft);
        divBooks.appendChild(divRight);
      }
    };

    fetchLibrary();
</script>👉 I have explained about async and await in detail in this post.
Conclusion: Choosing Between XMLHttpRequest and the Fetch API
In summary, both XMLHttpRequest and the Fetch API are effective tools for retrieving XML data in JavaScript, each suited to different scenarios. XMLHttpRequest is ideal for legacy projects or environments requiring older browser support, offering detailed control through properties like readyState and onreadystatechange.
On the other hand, the Fetch API is the modern, promise-based alternative that provides cleaner syntax, easier error handling, and better integration with async/await, making it the preferred choice for contemporary web development. Understanding both methods allows developers to choose the right tool based on project requirements, browser compatibility, and code maintainability.
