Static vs Dynamic Controls: Why Events Matter
Every control in a UserForm, whether it's a button, textbox, or dropdown, can respond to events like Click, Change, or DblClick. When you drag and drop controls onto a UserForm, VBA automatically wires up these default events for you.
But when you create controls dynamically at runtime, you need to explicitly attach events using the WithEvents keyword in a Class Module. This tutorial shows you how to do just that, step by step.
What Is WithEvents and Why It Matters
In VBA, WithEvents is a special keyword that lets you listen for and respond to events triggered by an object, like a button click or textbox change. Normally, when you drag controls onto a UserForm, VBA automatically wires up those events. But when you create controls dynamically at runtime, VBA doesn't know which events to monitor unless you explicitly tell it to. That’s where WithEvents comes in.
Behind the scenes, WithEvents creates a connection between the control and a Class Module that contains the event-handling code. This class acts like a middleman. It watches the control and runs your custom code when something happens (like a user typing or clicking). Without WithEvents, your dynamically added controls would just sit there visible, but unresponsive.
Insert a UserForm in Excel
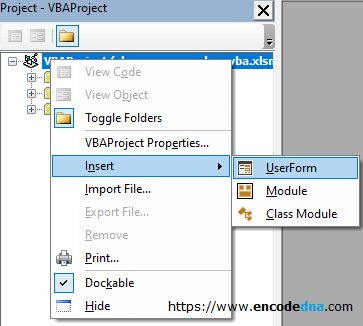
Adding a UserForm is easy. Just open your Excel workbook and save it as a .xlsm file to enable macros. Then press Alt + F11 to launch the VBA editor. In the Project Explorer, right-click your project and choose Insert > UserForm. That’s it. Your form is ready to build. See the image 👇.

Now we will create two controls at runtime and add some events to the controls.
Do not drag and drop any control on the UserForm.
Option Explicit

Public tbPin As MSForms.TextBox     ' The textbox control.
Dim objMyEventClass As New Class1   ' Create an object of the Class (where we declared the events).

Private Sub UserForm_Initialize()

    ' Create and add a textbox control.
    Set tbPin = Me.Controls.Add("Forms.TextBox.1")
    With tbPin
        .Top = 8
        .Left = 10
        .Width = 130
        .name = "thePin"
    End With

    Set objMyEventClass.tbEvents = tbPin       ' Now, attach an event to the textbox.

    ' Create and add a button control.
    Dim btEx As MSForms.CommandButton
    Set btEx = Me.Controls.Add("Forms.CommandButton.1")
    With btEx
        .Top = 50
        .Left = 10
        .Width = 130
        .Height = 25
        .Caption = "Submit"
    End With

    Set objMyEventClass.btEvents = btEx      ' Attach at event to the button.
End Sub
Connecting Controls to Events
I made the textbox (tbPin) public so it can be accessed from the Class Module where the events are handled. The command button is kept private since it's only used within the UserForm.
Once the controls are created and positioned, I link them to their events, like detecting text changes or button clicks. These event-handling routines are written inside a Class Module.
To make this work, I also created an object of the class, which acts as a bridge between the controls and their events. This setup lets the controls respond when users interact with them.
Dim objMyEventClass As New Class1
Add a Class Module
The Class Module is where you define the events for your dynamically created controls using WithEvents. This approach is considered best practice because it keeps your event-handling code organized and reusable. By declaring events as Public in the class, they become accessible to any UserForm or object in your application, making your code cleaner, easier to manage, and more scalable.
So, let's insert a Class module.
The process is the same as inserting a UserForm. Open Project Explore, right-click the project and from the insert option, choose Class Module.
Option Explicit

Public WithEvents tbEvents As MSForms.TextBox
Public WithEvents btEvents As MSForms.CommandButton

Private Sub tbEvents_Change()
    If Len(UserForm1.tbPin) > 6 Then
        MsgBox "Max 6 digits only"

        With UserForm1.tbPin
            .Text = ""
            .SetFocus
        End With
    End If
End Sub

Private Sub btEvents_click()
    If Trim(UserForm1.tbPin) <> "" Then
        Call showMyPin(UserForm1.tbPin)
    End If
End Sub

Private Sub showMyPin(pin As String)
    MsgBox "You have entered " & pin
End Sub
🚀 Mastering keyboard shortcuts in Excel isn't just about speed, it's about working smarter. In 2025, with more features and data tools packed into Excel than ever before, knowing the right shortcuts can save you hours of clicking and menu-hunting. Whether you're navigating large datasets, formatting cells, or running formulas, these shortcuts help you stay efficient and focused. Think of them as your productivity superpowers.
Check this out... Excel Keyboard Shortcuts You Should Know in 2025
There are two events: one for the textbox (Change) and another for the command button (click). To handle these events, I have defined two variables using WithEvents, in the beginning the class.
Public WithEvents tbEvents As MSForms.TextBox
Public WithEvents btEvents As MSForms.CommandButton
Similarly, you can add other events (that are available) in your Class module and attach it the controls.
Run the application. Enter a 6-digit value in the textbox and press the button. If you enter more than 6 digits in the box, the textbox's Change event will show a message and will ask to enter only 6 digits.
The command button's click event will pick the data entered in the textbox, calls a procedure that will show the value.
🚀 Related Tutorial:
Now, learn how to dynamically add dropdowns and checkboxes in Excel UserForms using VBA, complete with event handling and step-by-step code.
