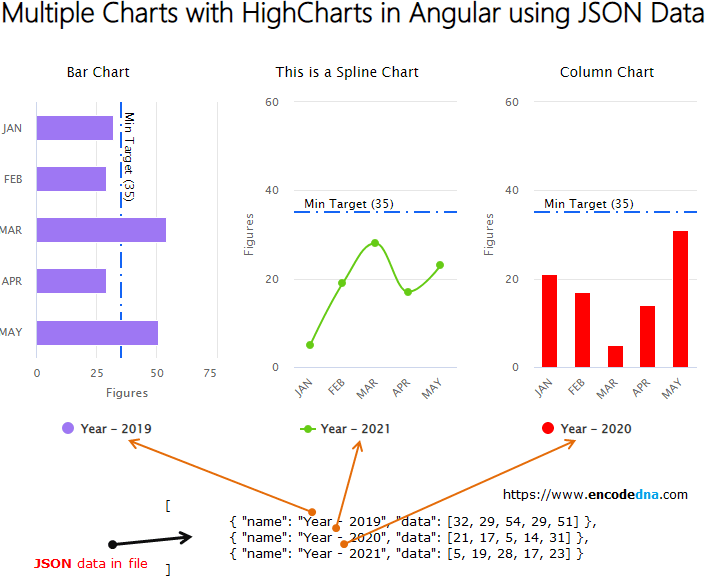
Create an application using Angular Command Line Interface or the CLI. Open the command prompt and go to the folder where you want to create the project.
ng new angularCharts
go to the folder…
cd angularCharts
and launch the server…
ng serve --o
Install HighChart Library
If you haven’t done this yet, then install the library via command line.
npm install highcharts
Create JSON file
We will use JSON data for the charts. The data will be extracted from a file.
Go to assets folder. You can find this folder under src folder in your Angular project. Create a file named sales-data.json, copy the below JSON in the file and save it.
[
    { "name": "Year - 2019", "data": [32, 62, 54, 29, 51] },
    { "name": "Year - 2020", "data": [21, 17, 5, 14, 31] },
    { "name": "Year - 2021", "data": [5, 19, 28, 17, 23] }
]
I have a data set for three different years. It will generate three charts for each year.
Remember: You’ll have to create and save the JSON file inside assets folder.
/src/assets/sales-data.json
👉 Some advice here…
Sometimes, charts in your Angular application might need more data or data extracted from a database (a big database) like SQL Server, Oracle etc. If you want to know how to extract data from a database (like SQL Server) for HighCharts in Angular, see this post.
Open app.module.ts file under src/app/ folder and add HttpClientModule.
import { BrowserModule } from '@angular/platform-browser';
import { NgModule } from '@angular/core';
import { AppComponent } from './app.component';

import { HttpClientModule } from '@angular/common/http';

@NgModule({
  declarations: [
    AppComponent
  ],
  imports: [
    BrowserModule,
    HttpClientModule
  ],
  providers: [],
  bootstrap: [AppComponent]
})
export class AppModule { }We’ll now integrate “HighCharts” by importing the library and we’ll also import “HttpClient” service.
Open app.component.ts file and add the below code.
import { Component, OnInit } from '@angular/core';

import { HttpClient } from '@angular/common/http';
import { HttpErrorResponse } from '@angular/common/http';

import * as Highcharts from 'highcharts'    // import highcharts library

@Component({
  selector: 'app-root',
  templateUrl: './app.component.html',
  styleUrls: ['./app.component.css']
})
export class AppComponent {
  title = 'Multiple Charts with HighCharts in Angular';

  constructor (private httpService: HttpClient) {   }

  public arrSales = [];
  public chartOptions: any = {
    chart: {  },

    xAxis: {        // the 'x' axis or 'category' axis.
        categories: ['JAN', 'FEB', 'MAR', 'APR', 'MAY']
    },

    yAxis: {        // the 'y' axis or 'value' axis.
      min: 0, max: 60,
      title: { text: 'Figures' },
      allowDecimals: true,
      plotLines: [{
          value: 35,
          color: '#1464F4',
          dashStyle: 'longdashdot',       // default value is solid.
          width: 2,
          label: {
              text: 'Min Target (35)'
          }
      }]
    },

    title: { style: {color: '#000', fontSize : '14px'} },
      // font size 18px is default
      // color: #333 is default

    series: [
      {
        data: []
      }
    ],

    colors: [],

    tooltip: {
        backgroundColor: '#FCFFC5'
    }
  }

  ngOnInit () {
    this.httpService.get('./assets/sales-data.json', {responseType: 'json'}).subscribe(
      data => {
        this.arrSales = data as any[];      // populate array with json.
        this.showChart();                   // show the chart.
      },
      (err: HttpErrorResponse) => {
        console.log (err.message);
      }
    );
  }

  // Show multiple charts.
  showChart () {
    this.chartOptions.chart.type = 'column';
    this.chartOptions.title.text = 'Column Chart Example';
    this.chartOptions.series[0] = this.arrSales[1];     // assign data to the 1st chart.
    this.chartOptions.colors[0] = 'red';
    Highcharts.chart('divColumn', this.chartOptions);   // make the chart.

    this.chartOptions.chart.type = 'spline';
    this.chartOptions.title.text = 'This is a Spline Chart';
    this.chartOptions.series[0] = this.arrSales[2];     // assign data to the 2nd chart.
    this.chartOptions.colors[0] = 'rgb(102,203,22)';
    Highcharts.chart('divSpline', this.chartOptions);   // make the chart.

    this.chartOptions.chart.type = 'bar';
    this.chartOptions.title.text = 'Bar Chart Example';
    this.chartOptions.series[0] = this.arrSales[0];   // assign data to the 3rd chart.
    this.chartOptions.colors[0] = '#9e77f3';
    Highcharts.chart('divBar', this.chartOptions);    // make the chart.
  }
}
Let me explain how it works.
The options for the charts are important. I have defined few options before and the remaining options after extracting data from the JSON file.
• Chart type: I have not defined the type chart type. I have defined it when assigning data to the charts (the series).
chart: { },• Series: Now, see the series object. There is no data in it either. It’s a dynamic series. The series gets data later after the HTTP call is made.
series: [
    {
        data: []
    }
],
• Title: Since each title of the chart is different, I have not defined any text to title in the beginning. However, I have changed the default color and font size of the title option.
Title text is assigned after the HTTP call.
title: { style: {color: '#000', fontSize : '14px'} },• yAxis: Ok, here I have defined the yAxis object, also called, value axis. It shows a blue horizontal line across the charts, showing Minimum Sales Target. This is optional.
The data for the chart is first populated into an array after making an HTTP call using get() method. A function called showChart() is called.
data => {
    this.arrSales = data as any[];
    this.showChart();
},
Finally, the charts are created by assigning data (in the array) to the series object and chart types are defined.
Each chart or graph is shown using a different color (see the image in the beginning). So, colors are assigned to individual charts.
Now, create the template for the project. It has three DIV elements with unique ids. Its where the charts are displayed.
<div style="text-align:center; width: 800px;">
  <h1 style="font: 30px Verdana; color: rgb(102,203,22)">
    {{ title }}
  </h1>

  <div id="divBar" style="width: 30%; float: left;"></div>
  <div id="divSpline" style="width: 30%; float: left;"></div>
  <div id="divColumn" style="width: 30%;"></div>
</div>
You now have multiple charts (or graphs) to display on web page, using different types of data.
Run the application.
ng serve --o
Thanks for reading. 🙂
