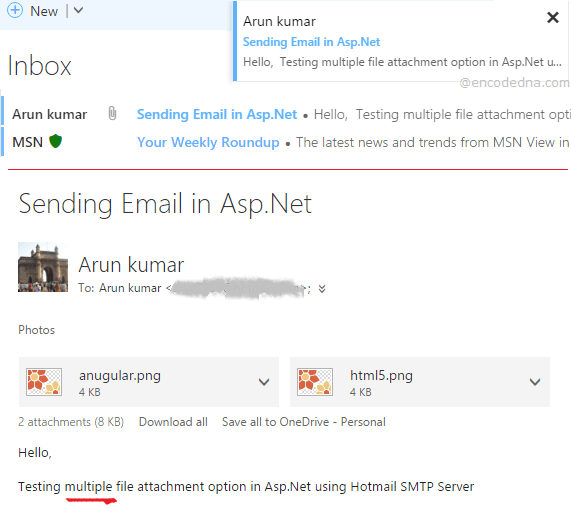
Image showing email with 2 attachments received in Hotmail
The namespace System.Net.Mail in Asp.Net provides all the functions and properties that would allow us to create an application to send emails. The namespace contains classes such as MailMessage and smtpClient, which provides methods that we need to send emails. The namespace also contains a class called Attachment that would provide methods to add (or attach) file(s) with the email before sending it.
Syntax
public class Attachment : AttachmentBase
In the example here, I am going to use all the three classes that I have mentioned in the above paragraph. Therefore, we need to import the namespace System.Net.Mail in the beginning of code behind procedure.
To get multiple files from the fileUpload control we will use HttpFileCollection and HttpPostedFile classes of System.Web namespace.
Namespaces Used in this Example
• System.Net
• System.Net.Mail
• System.Web
However, first let’s create our markup, where we’ll have few textboxes, a button and more importantly a fileUpload control, to select file(s) for attachment.
<!DOCTYPE html>
<html>
<head>
    <title>Send Email Example with Multiple Attachments in Asp.Net using Hotmail SMTP Mail Server</title>
    <style>
        #container {
            width:450px;
            background:rgb(255, 251, 221);
            padding:10px;
        }
        input[type=text], textarea {  /* STYLE ONLY INPUTBOX AND TEXTAREA. */
            margin:8px;
            padding:8px 5px;
            background:#FFF;
            border-radius:10px;border:none;
            box-shadow:0 4px 6px -5px #333,inset 0 4px 6px -5px #333;
            letter-spacing:1.5px;
            width:300px;
        }
        input[type=submit] {        /* STYLE THE BUTTON. */
            cursor:pointer;
            width:100px;
            height:40px;
        }
        ul {
            padding:0; margin:0;
        }
        li {
            width:120px;
            display:inline-table;
        }
    </style>
</head>
<body>
    <form id="Form1" runat="server">
        <div id="container">
            <ul>
                <li>From Email</li>
                <li>
                    <asp:TextBox ID="fromEmail"
                        placeholder="From"
                            runat="server"></asp:TextBox>
                </li>
            </ul>
            <ul>
                <li>To Email</li>
                <li>
                    <asp:TextBox ID="toEmail"
                        placeholder="To"
                            runat="server"></asp:TextBox>
                </li>
            </ul>
            <ul>
                <li>Add a Subject</li>
                <li>
                    <asp:TextBox ID="subject"
                        placeholder="Subject"
                            runat="server"></asp:TextBox>
                    </li>
            </ul>
            <ul>
                <li style="vertical-align:top;padding-top:10px;">Email Body</li>
                <li>
                    <textarea id="body"
                        placeholder="Body"
                            rows="8" cols="40" runat="server"></textarea>
                </li>
            </ul>

            <%--ADD fileUpload CONTROL--%>
            <ul>
                <li style="vertical-align:top;"><label>Attach a File</label></li>
                <li><asp:FileUpload ID="fileUpload" multiple runat="server" /></li>
            </ul>

            <ul>
                <li>
                    <asp:Button id="send" Text="Send Mail"
                        OnClick="SendEmail"
                        OnClientClick="return validate();"
                        runat="server" />
                </li>
                <li style="width:auto;"><label id="message" runat="server"></label></li>
            </ul>
        </div>
    </form>
</body>This JavaScript code will validate user inputs such as from and to fields.
<script>
    function validate() {
        if (document.getElementById('fromEmail').value == '') {
            alert("Enter From Email ID");
            document.getElementById('fromEmail').focus();
            return false;
        }
        if (document.getElementById('toEmail').value == '') {
            alert("Enter Recipient's Email ID");
            document.getElementById('toEmail').focus();
            return false;
        }
    }
</script>
</html>
using System;
using System.Net;
using System.Net.Mail;

using System.Web;

public partial class _Default : System.Web.UI.Page
{
    protected void SendEmail(object sender, EventArgs e)
    {
        try {

            // ADD "FROM" AND "TO" ADDRESS, ALONG WITH THE SUBJECT AND BODY.
            MailMessage mail =
                new MailMessage(
                    fromEmail.Text.Trim(),
                    toEmail.Text.Trim(),
                    subject.Text.Trim(),
                    body.InnerHtml.Trim());

            // CHECK IF USER HAS SELECTED ANY FILE.
            if (fileUpload.HasFile)
            {
                HttpFileCollection hfc = Request.Files;

                // LOOP THROUGH EACH SELECTED FILE.
                for (int i = 0; i <= hfc.Count - 1; i++)
                {
                    HttpPostedFile hpf = hfc[i];

                    // CREATE A FILE ATTACHMENT.
                    Attachment objAttachements =
                        new Attachment(hpf.InputStream,
                            hpf.FileName);

                    // ADD FILE ATTACHMENT TO THE EMAIL.
                    mail.Attachments.Add(objAttachements);
                }
            }

            // DEFINE HOTMAIL SMTP MAIL SERVER ALONG WITH A PORT (587 IN THIS CASE)
            // USING SmtpClient() CLASS.
            SmtpClient client = new SmtpClient("smtp.live.com", 587);
            client.UseDefaultCredentials = true;

            // NETWORK CREADENTIALS.
            // YOUR HOTMAIL ID ALONG WITH THE PASSWORD.
            // NOTE: CHANGE THE STRING "your_hotmail_password"
            // WITH A VALID HOTMAIL PASSWORD.

            NetworkCredential credentials =
                new NetworkCredential(fromEmail.Text, " your_hotmail_password");

            client.Credentials = credentials;
            client.EnableSsl = true;
            client.DeliveryMethod = SmtpDeliveryMethod.Network;

            client.Send(mail);          // FINALLY, SEND THE MAIL.

            message.InnerText = "Your message has been sent.";
            message.Attributes.Add("style", "padding:2px 5px;background-color:#DFF0D8;color:#3C763D;");
        }
        catch {
            message.InnerText = "Error. Unable to send mail.";
            message.Attributes.Add("style", "padding:2px 5px;color:red;");
        }
    }
}How to Upload Multiple Files using C# and Vb.Net in Asp.Net
Option Explicit On

Imports System.Net
Imports System.Net.Mail

Partial Class _Default
    Inherits System.Web.UI.Page

    Protected Sub SendEmail(ByVal sender As Object, ByVal e As EventArgs)
        Try
            ' ADD "FROM" AND "TO" ADDRESS, ALONG WITH THE SUBJECT AND BODY.
            Dim mail As New  _
                MailMessage(fromEmail.Text, _
                            toEmail.Text,
                            Trim(subject.Text),
                            Trim(body.InnerHtml))

            If fileUpload.HasFile Then          ' CHECK IF USER HAS SELECTED ANY FILE.

                Dim hfc As HttpFileCollection = Request.Files

                ' LOOP THROUGH EACH SELECTED FILE.
                For i As Integer = 0 To hfc.Count - 1
                    Dim hpf As HttpPostedFile = hfc(i)

                    ' CREATE A FILE ATTACHMENT.
                    Dim objAttachements As New Attachment(
                        hpf.InputStream,
                        hpf.FileName)

                    ' ADD FILE ATTACHMENT TO THE EMAIL.
                    mail.Attachments.Add(objAttachements)
                Next
            End If

            ' DEFINE HOTMAIL SMTP MAIL SERVER ALONG WITH A PORT (587 IN THIS CASE)
            ' USING SmtpClient() CLASS.
            Dim client As New SmtpClient("smtp.live.com", 587)
            client.UseDefaultCredentials = True

            ' NETWORK CREADENTIALS.
            ' YOUR HOTMAIL ID ALONG WITH THE PASSWORD.
            ' NOTE: CHANGE THE STRING "your_hotmail_password"
            ' WITH A VALID HOTMAIL PASSWORD.

            Dim credentials As _
                New NetworkCredential(fromEmail.Text, "your_hotmail_password")
            client.Credentials = credentials
            client.EnableSsl = True
            client.DeliveryMethod = SmtpDeliveryMethod.Network

            client.Send(mail)           // FINALLY, SEND THE MAIL.

            message.InnerText = "Your message has been sent."
            message.Attributes.Add("style", "padding:2px 5px;background-color:#DFF0D8;color:#3C763D;")

        Catch ex As Exception
            message.InnerText = "Error. Unable to send mail."
            message.Attributes.Add("style", "padding:2px 5px;color:red;")
        Finally
        End Try
    End Sub
End Class
That’s it. You now have a fully functional email sending application with multiple attachment option. This is very useful example. Thanks for reading. ☺
