Last update: 9th May 2024
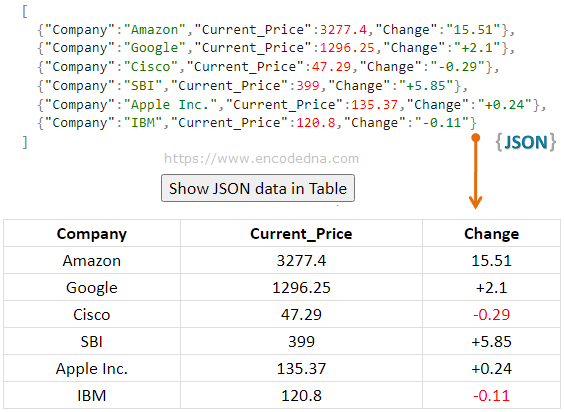
You can use the getJSON() method in jQuery to extract data from a JSON file. I’ll show you how using this method, you can extract data from an external JSON and file and display the data in an HTML table.getJSON() Syntax
$.getJSON(url, data, success)
The "getJSON()" method uses Ajax to make an HTTP GET request (to the server). It takes 3 parameters. The first parameter is the file URL (or the location of the file), the second parameter (its optional) is some data that you want to send to the server, the third parameter is a function it will run upon successful request.
Now, let’s see the example.
Here’s the sample JSON file. It has fey keys and data.
<!DOCTYPE html>
<html>
<head>
    <script src="https://ajax.googleapis.com/ajax/libs/jquery/1.10.1/jquery.min.js"></script>

    <style>
        table { width: 100%; }
        table, th, td {
            border: solid 1px #dddddd;
            border-collapse: collapse;
            padding: 2px 3px;
            text-align: center;
        }
        th { font-weight: bold; }
    </style>
</head>
<body>
    <p><input type='button' value='Click to show data in Table' id='bt'></p>
    <div id='showData'></div>
</body>
There's not much in the markup section, since I am creating an HTML table dynamically and then add it my web page. I just have an <input> button and a <div> element, which serves as a container to the table.
<script>
    $('#bt').click(function () {
        $.getJSON("../../library/stock-ticker.json", function (data) {

            let keys;
            let items = [];

            $.each(data, function (index, value) {
            	keys = Object.keys(value);
                items.push(value);
            });

            let table = document.createElement("table");
            let tr = table.insertRow(-1);

            // First, create table header.
            for (let i = 0; i < keys.length; i++) {
              let th = document.createElement('th');
              th.innerHTML = keys[i];
              tr.appendChild(th);
            }

            // Now, show the details in rows and columns.
            for (let k = 0; k < items.length; k++) {
                tr = table.insertRow(-1);

                for (let j = 0; j < keys.length; j++) {
                    let tabCell = tr.insertCell(-1);

                    // Check if its a negative number.
                    // Math.sign() method is a new ES6 feature, to check if a number is positive or negative.
                    if (Math.sign(items[k][keys[j]]) === -1) {
                    	tabCell.innerHTML = '<span style="color:red;">' + items[k][keys[j]] + '</span>';
                    }
                    else {
                    	tabCell.innerHTML = items[k][keys[j]];
                    }
                }
            }

            // Add the newly created table to the DIV element.
            let eleShow = document.getElementById('showData');
            eleShow.innerHTML = '';
            eleShow.appendChild(table);
		 });
    });
</script>
</html>Image
not real data

The getJSON() method is called when you click the button. The method in example has two parameters, the URL of the file, followed the data the server returns (if the request is successful). I am not passing any data to the server.
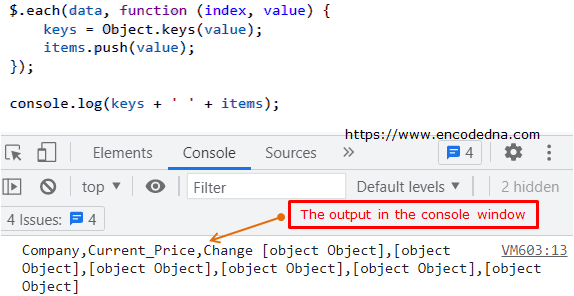
I’ll separate the key (from the JSON) and the data and store it in arrays. The keys are for the Headers of the table.
$.each(data, function (index, value) {
    keys = Object.keys(value);
    items.push(value);
});

console.log(keys + ' ' + items);
See the browser console window. You will see the keys and the data object.
Image

Next, I have created an HTML table object and added header to the table.
The final for loop will create rows for the table and add data to it.
