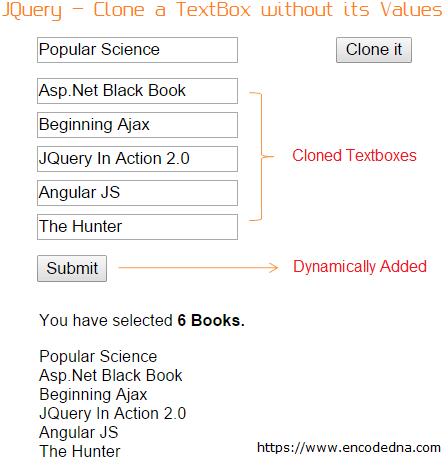
We will now take a step further, and here I’ll show you another example on how you can clone a textbox control without its value, using the .clone() method. That is, every cloned textbox will have its own identity, and will accept unique values.

It is quite natural for a .clone() method to copy every defined property, event and value to create another element.
However, here in this article, I’ll add a textbox and a button control on our web page. The first textbox will have the name of a book.
When a user clicks the button, it will clone the textbox (a blank textbox) and add it on the web page. Along with it, we will also append a button (after the cloned textbox), and name it Submit. The submit button will have the “onclick” event added dynamically.
The user can add N number of textboxes, each will have its own identity. Once they add values to the textboxes, they will click the submit button to see the entered value in the first textbox as well as values in the cloned boxes.
<body>
    <script src="https://ajax.googleapis.com/ajax/libs/jquery/1.7.1/jquery.min.js"></script>

    <div id="container1">
        <input type="text" class="input" id="tbBooks" value="Popular Science" />
        <input type="button" id="btClone" value="Clone it" style="float:right;" />
    </div>

    <div id="container2" style="display:none;"></div>
</body>

<script>
    $(document).ready(function () {
        var iCnt = 1;

        $('#btClone').on('click', function () {
            $('#tbBooks')
                .clone().val('')      // CLEAR VALUE.
                .attr('style', 'margin:3px 0;', 'id', 'tbBooks' + iCnt)     // GIVE IT AN ID.
                .appendTo("#container2");

            // ADD A SUBMIT BUTTON IF ATLEAST "1" ELEMENT IS CLONED.
            if (iCnt == 1) {
                var divSubmit = $(document.createElement('div'));

                $(divSubmit).append('<input type=button ' +
                    'class="bt" onclick="GetTextValue()" ' +
                    'id=btSubmit value=Submit />');
            }
            $('#container2').after(divSubmit);
            $("#container2").attr('style', 'display:block;margin:3px;');

            iCnt = iCnt + 1;
        });
    });

    // PICK THE VALUES FROM EACH TEXTBOX WHEN "SUBMIT" IS CLICKED.
    var divValue, values;

    function GetTextValue() {
        var iTxtCnt = 0;    // COUNT TEXTBOXES.
        values = '';

        $(divValue).empty();
        $(divValue).remove();

        $('.input').each(function () {
            divValue = $(document.createElement('div')).css({
                padding: '5px', width: 'auto'
            });

            values += this.value + '<br />'
            iTxtCnt = iTxtCnt + 1;
        });

        $(divValue).append('<p>You have selected <b>' + iTxtCnt +
            ' Books.</b></p>' + values);
        $('body').append(divValue);
    }
</script>
</html>There is one important method I have added to clone blank textboxes.
.clone().val('')
The .val() method added immediately after .clone() method, will clear value inside the cloned textbox. Thereby, giving us a brand new textbox, with a new unique id, set using the .attr() method.
For the example in this article, I have borrowed few lines of code from another article that I have written before. The article shows how you can add and remove HTML elements dynamically using jQuery. The benefit of cloning or adding and removing dynamic elements on a web page, is to allow your users to create and add the elements, easily and whenever necessary.
Hope this will help web developers in some way or the other. Please share the article with your friends on Twitter or Facebook.
