Last updated: 7th May 2024
You can upload multiple files instantly and efficiently, without a plug-in. I have shared an example here using C#. But here in this post, I'll show you how you can do this using a jQuery plug-in called Multifile.You can learn more about this Plug-in here.
A Little History
Before migrating to Asp.Net, many of us have possibly worked with Classic ASP and I was one of them. Those days I used to visit many ASP forums, where I read queries from developers, frantically looking for solutions to upload multiple files in one single go.
The solution however, was to create multiple FileUpload controls dynamically using JavaScript. We would create clones of a single FileUpload control and add events to it.
Anyways, that phase have passed and we have better solutions in the form of plug-in's to make the task easy.
jQuery Multifile Plug-in
The jQuery Multifile Plug-in simplifies file upload, without too much fuss and you don’t have write lengthy repeated scripts. This plug-in effortlessly works in sync with the Asp.Net FileUpload control.
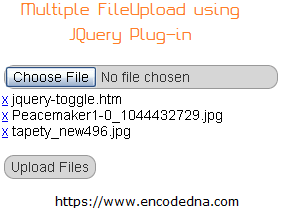
There is one interesting and useful feature I would like to bring it to my readers notice is that you can cancel or remove a selected file or other files by just clicking the small “x” (cross) button at beginning of the files you have selected. (See image below). This is a good feature of this plug-in.
Properties of jQuery Multifile Plug-in
Property accept
Not just multiple, you also have options to select particular type of files there by restricting any types of files getting uploaded on to the server. The property accept will allow you to choose and upload files with particular extensions.
<asp:FileUpload ID="fileUpload" class="multi" accept="jpg|png" runat="server"/>
Property maxlength>
This property will restrict the number of files a user can select to upload. In one of my previous articles we have shown how to Upload multiple files using Asp.Net and also restrict the number files to be uploaded on to the server.
One of its cool features is its ability to count and validate files before uploading. Let’s say you have restricted it to “5” files per upload, the Choose file button will be instantly disabled when the specified number of files has been selected by the user.
<asp:FileUpload ID="fileUpload" class="multi" maxlength="5" runat="server" />
How to work with Multifile
Its very simple to use. You just need the package. Follow these steps.
1) Download multifile from GitHub. After you unzip the file, copy the files in the root directory of you .Net project.
2) You'll have to add jQuery CDN followed by the plug-in path inside the <head> section of the web page.
3) Add multiple and class="multi" attributes to your FileUpload control. See the markup below.
<!DOCTYPE html>
<html>
<head>
    <script src="https://ajax.googleapis.com/ajax/libs/jquery/3.4.1/jquery.min.js"></script>
    <script src="multifile-master/jquery.MultiFile.min.js"></script>
</head>
<body>
    <form id="form1" runat="server">
        <div>
            <p><asp:FileUpload ID="fileUpload" class="multi" multiple runat="server" /></p>

            <p><input type="button" id="btUpload" value="Upload Files" onserverclick="UploadFiles" runat="server" /></p>
            <p><asp:Label ID="lblUploadStatus" runat="server"></asp:Label></p>
        </div>
    </form>
</body>
</html>using System; using System.IO; using System.Web; // FOR HttpFileCollection. public partial class _Default : System.Web.UI.Page { public void UploadFiles(object sender, EventArgs args) { if (fileUpload.HasFile) { int iUploadedCnt = 0; HttpFileCollection hfc = Request.Files; for (int i = 0; i <= hfc.Count - 1; i++) // CHECK THE FILE COUNT. { HttpPostedFile hpf = hfc[i]; if (hpf.ContentLength > 0) { // CHECK IF THE SELECTED FILE ALREADY EXISTS IN FOLDER. (AVOID DUPLICATE) if (!File.Exists(Server.MapPath("Uploaded_Files\\") + Path.GetFileName(hpf.FileName))) { // SAVE THE FILE IN A FOLDER. hpf.SaveAs(Server.MapPath("Uploaded_Files\\") + Path.GetFileName(hpf.FileName)); iUploadedCnt += 1; } } // WE HAVE DONE IT. SHOW RESULT. lblUploadStatus.Text = "<b>" + iUploadedCnt + "</b> file(s) Uploaded."; } } } }
Option Explicit On
Imports System.IO

Partial Class _Default
    Inherits System.Web.UI.Page

    Public Sub UploadFiles(ByVal sender As Object, ByVal args As EventArgs)
        If fileUpload.HasFile Then

            Dim hfc As HttpFileCollection = Request.Files
            Dim iUploadedCnt As Integer = 0

            For iCnt As Integer = 0 To hfc.Count - 1        ' CHECK THE FILE COUNT.
                Dim hpf As HttpPostedFile = hfc(iCnt)
                If hpf.ContentLength > 0 Then

                    ' CHECK IF THE SELECTED FILE ALREADY EXISTS IN FOLDER. (AVOID DUPLICATE)
                    If Not File.Exists(Server.MapPath("Uploaded_Files\") & _
                        Path.GetFileName(hpf.FileName)) Then

                        ' SAVE THE FILES IN THE FOLDER.
                        hpf.SaveAs(Server.MapPath("Uploaded_Files\") & _
                            Path.GetFileName(hpf.FileName))
                        iUploadedCnt = iUploadedCnt + 1

                    End If
                End If
            Next

            ' WE HAVE DONE IT. SHOW RESULT.
            lblUploadStatus.Text = "<b>" & iUploadedCnt & "</b> file(s) Uploaded."
        End If
    End Sub
End Class
The end result should be something like this.