Last updated: 20th June 2024
You can use WinForms DataGridView control to perform simple CRUD operations. Your data source can be anything like an SQL Server database, JSON or Ms-Excel. Here in this post I am sharing a small program in C# and Vb showing how to import data from an Excel to a DataGridView control and modify the existing data or add new data back to the Excel sheet.To access Excel data (or any other Microsoft office app) from your Windows Forms application, you’ll have to first add Microsoft Excel 12.0 Object Library as reference to your project and later import or use a namespace named Microsoft.Office.Interop.Excel inside the applications source.
Add a Reference
After you have created the project, add a reference. From the top menu (in your projects IDE), select the "Project" tab and choose "Add Reference…". It will open the "Add Reference" window. Select the "COM" tab and find Microsoft Excel 12.0 Object Library (or a higher version) from the list. Select it and Click Ok. See the below image.

We need few controls on our form. Therefore, open the form design window and add a button, a DataGridView control and an "OpenFileDialog" control.
Here’s the code.
In the beginning of the program, I have added the namespace Excel = Microsoft.Office.Interop.Excel; which provides me all the classes, methods and properties to interact with an Excel file.
I have also added the namespace "using System.Drawing;" (in C# only. Its readily available in VB). This is optional though. Since, I am using the Color property to change the color of the first "columns" value in the Grid. I am using this property inside the dataGridView1_RowStateChanged event.
I have explained the properties and events below.
using System;
using System.Collections.Generic;
using System.Windows.Forms;

using Excel = Microsoft.Office.Interop.Excel;       // EXCEL APPLICATION.
using System.Drawing;           // FOR COLOR OPTION.

namespace edit_modify_excel
{
    public partial class Form1 : Form
    {
        public Form1()
        {
            InitializeComponent();

            // (AN OPTIONAL FEATURE I HAVE ADDED)
            // ADD THIS CODE TO MAKE "dataGridView1_RowStateChanged" EVENT WORK PROPERLY.
            // YOU CAN ALSO ADD THIS CODE IN YOUR "Form1.Designer.cs" FILE.
            this.dataGridView1.RowStateChanged += new System.Windows.Forms.DataGridViewRowStateChangedEventHandler(dataGridView1_RowStateChanged);
        }

        // CREATE EXCEL OBJECTS.
        Excel.Application xlApp = new Excel.Application();
        Excel.Workbook xlWorkBook;
        Excel.Worksheet xlWorkSheet;

        string sFileName;

        // OPEN FILE DIALOG AND SELECT AN EXCEL FILE.
        private void cmdSelect_Click(object sender, EventArgs e)
        {
            OpenFileDialog1.Title = "Excel File to Edit";
            OpenFileDialog1.FileName = "";
            OpenFileDialog1.Filter = "Excel File|*.xlsx;*.xls";

            if (OpenFileDialog1.ShowDialog() == DialogResult.OK)
            {
                sFileName = OpenFileDialog1.FileName;

                if (sFileName.Trim() != "")
                {
                    Excel2Grid(sFileName);
                }
            }
        }

        // IMPORT DATA FROM EXCEL AND POPULATE THE GRID.
        private void Excel2Grid(string sFile)
        {
            xlApp = new Excel.Application();
            xlWorkBook = xlApp.Workbooks.Open(sFile);               // WORKBOOK TO OPEN THE EXCEL FILE.
            xlWorkSheet = xlWorkBook.Worksheets["Sheet1"];          // THE SHEET WITH THE DATA.

            dataGridView1.Rows.Clear();
            dataGridView1.Columns.Clear();

            int iRow, iCol;

            // FIRST, CREATE THE DataGridView COLUMN HEADERS.
            for (iCol = 1; iCol <= xlWorkSheet.Columns.Count; iCol++)
            {
                if (xlWorkSheet.Cells[1, iCol].value == null)
                {
                    break;      // BREAK LOOP.
                }
                else
                {
                    DataGridViewTextBoxColumn col = new DataGridViewTextBoxColumn();
                    col.HeaderText = xlWorkSheet.Cells[1, iCol].value;
                    int colIndex  = dataGridView1.Columns.Add(col);        // ADD A NEW COLUMN.
                }
            }

            // ADD A BUTTON AT THE LAST COLUMN IN EVERY ROW.
            DataGridViewButtonColumn btn = new DataGridViewButtonColumn();
            btn.HeaderText = "";
            btn.Text = "Save Data";
            btn.Name = "btSave";
            btn.UseColumnTextForButtonValue = true;
            dataGridView1.Columns.Add(btn);

            // ADD ROWS TO THE GRID USING EXCEL DATA.
            for (iRow = 2; iCol <= xlWorkSheet.Rows.Count; iRow++)
            {
                if (xlWorkSheet.Cells[iRow, 1].value == null)
                {
                    break;      // BREAK LOOP.
                }
                else
                {
                    // CREATE A STRING ARRAY USING THE VALUES IN EACH ROW OF THE SHEET.
                    string[] row = new string[] { xlWorkSheet.Cells[iRow, 1].value,
                    xlWorkSheet.Cells[iRow, 2].value.ToString(),
                    xlWorkSheet.Cells[iRow, 3].value };

                    // ADD A NEW ROW TO THE GRID USING THE ARRAY DATA.
                    dataGridView1.Rows.Add(row);
                }
            }

            xlWorkBook.Close();
            xlApp.Quit();

            // CLEAN UP.
            System.Runtime.InteropServices.Marshal.ReleaseComObject(xlApp);
            System.Runtime.InteropServices.Marshal.ReleaseComObject(xlWorkBook);
            System.Runtime.InteropServices.Marshal.ReleaseComObject(xlWorkSheet);
        }

        protected override bool ProcessCmdKey(ref System.Windows.Forms.Message msg, System.Windows.Forms.Keys keyData)
        {
            if (keyData == Keys.Enter)
            {
                SendKeys.Send("{TAB}");     // MOVE NEXT CELL WHEN YOU PRESS ENTER KEY.
                return true;
            }
            else
            {
                return base.ProcessCmdKey(ref msg, keyData);
            }
        }

        // SAVE MODIFIED OR NEW DATA TO THE EXCEL SHEET.
        private void dataGridView1_CellContentClick(object sender, DataGridViewCellEventArgs e)
        {
            // EVERY ROW HAS A BUTTON AT THE LAST COLUMN.
            // SAVE THE DATA IN EXCEL AFTER CLICKING THE BUTTON.

            var ourGrid = (DataGridView)sender;
            if (ourGrid.Columns[e.ColumnIndex] is DataGridViewButtonColumn && e.RowIndex >= 0)
            {
                xlApp = new Excel.Application();
                xlWorkBook = xlApp.Workbooks.Open(sFileName);   // WORKBOOK TO OPEN THE EXCEL FILE.
                xlWorkSheet = xlWorkBook.Worksheets["Sheet1"];  // THE SHEET WITH THE DATA.

                // CHECK IF THE FIRST COLUMN IS ReadOnly.
                // THIS IS TO ENSURE THAT YOU MODIFY EXISTING DATA IN EXCEL.

                if (dataGridView1.Rows[e.RowIndex].Cells[0].ReadOnly == true)
                {
                    string sXL = xlWorkSheet.Cells[e.RowIndex + 2, 1].value;
                    string sGrid = dataGridView1.Rows[e.RowIndex].Cells[0].Value.ToString();

                    if (sXL == sGrid)
                    {
                        // MODIFY THE DATA.
                        xlWorkSheet.Cells[e.RowIndex + 2, 2].value =
                            dataGridView1.Rows[e.RowIndex].Cells[1].Value;  // SECOND COLUMN.
                        xlWorkSheet.Cells[e.RowIndex + 2, 3].value =
                            dataGridView1.Rows[e.RowIndex].Cells[2].Value;  // THIRD COLUMN.
                    }
                }
                else
                {
                    // ADD NEW DATA IN A NEW ROW IN EXCEL.
                    xlWorkSheet.Cells[e.RowIndex + 2, 1].value =
                        dataGridView1.Rows[e.RowIndex].Cells[0].Value;
                    xlWorkSheet.Cells[e.RowIndex + 2, 2].value =
                        dataGridView1.Rows[e.RowIndex].Cells[1].Value;
                    xlWorkSheet.Cells[e.RowIndex + 2, 3].value =
                        dataGridView1.Rows[e.RowIndex].Cells[2].Value;
                }

                xlWorkBook.Close();
                xlApp.Quit();

                // CLEAN UP.
                System.Runtime.InteropServices.Marshal.ReleaseComObject(xlApp);
                System.Runtime.InteropServices.Marshal.ReleaseComObject(xlWorkBook);
                System.Runtime.InteropServices.Marshal.ReleaseComObject(xlWorkSheet);
            }
        }

        // CHANGE THE COLOR OF VALUES IN THE FIRST COLUMN. MAKE THE VALUES REALONLY (CANNOT CHANGE).
        private void dataGridView1_RowStateChanged(object sender, DataGridViewRowStateChangedEventArgs e)
        {
            if (e.Row.Cells[0].Value != null)
            {
                e.Row.Cells[0].Style.ForeColor = Color.Gray;
                e.Row.Cells[0].ReadOnly = true;
            }
        }
    }
}
The procedure "Excel2Grid"
This procedure is called after you open the file dialog and select an Excel file. It first creates the "headers" for the Grid. Next, it will add buttons to the last column of each row.
DataGridViewButtonColumn btn = new DataGridViewButtonColumn();
Finally, it creates and adds the rows in the DataGridView, using data from the Excel sheet.
The Method ProcessCmdKey()
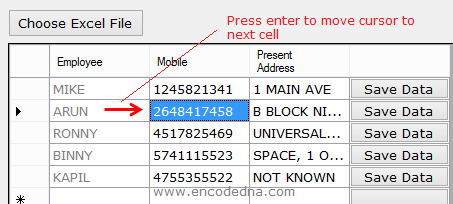
This method is used to handle keys. Usually, when you press the "Enter" key on a DataGridView cell, it would go to the next row. The cursor Moves vertically down. I can "override" the Enter keys default behavior using this method and convert it to Tab key (function), which moves the cursor horizontally that is, the cursor moves to the next cell.

DataGridView Event CellContentClick
The dataGridView1_CellContentClick is called when you click inside a Grid’s cell (any cell in any row). The last cell in each row has a Button, to save the data back to Excel file. Clicking the button will call this event and it would first check the control that was clicked. If it’s a button, it will extract data from that row and save the data in the Excel sheet.
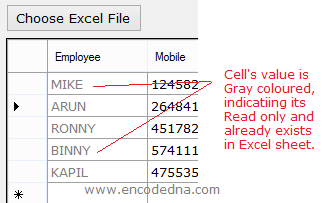
There is a condition. It checks if the first cell value is Read only (the values are Gray in Color). If yes, then this rows data already exists in the Excel sheet. Therefore, it would modify the data. Else, it would save the record in a new row in the Excel sheet.
DataGridView Event RowStateChanged
I am using the dataGridView1_RowStateChanged event to identify exiting data in Excel. Therefore, when you select and import Excel's data to the DataGridView, it would set the first cell’s value as Read only and change the fore color to Gray.

The color will differentiate between the existing and new data.
Option Explicit On
Imports Excel = Microsoft.Office.Interop.Excel          ' EXCEL APPLICATION.

Public Class frmImportExcel

    ' CREATE EXCEL OBJECTS.
    Dim xlApp As Excel.Application
    Dim xlWorkBook As Excel.Workbook
    Dim xlWorkSheet As Excel.Worksheet

    Dim sFileName As String = ""

    Private Sub cmdSelect_Click(sender As System.Object, e As System.EventArgs) Handles cmdSelect.Click
        With OpenFileDialog1
            .Title = "Excel File to Edit"           ' DIALOG BOX TITLE.
            .FileName = ""
            .Filter = "Excel File|*.xlsx;*.xls"     ' FILTER ONLY EXCEL FILES IN FILE TYPE.

            If .ShowDialog() = DialogResult.OK Then
                sFileName = .FileName

                If Trim(sFileName) <> "" Then
                    Excel2Grid(sFileName)
                End If
            End If
        End With
    End Sub

    ' IMPORT EXCEL DATA TO DATAGRIDVIEW.
    Private Sub Excel2Grid(ByVal sFile As String)
        xlApp = New Excel.Application
        xlWorkBook = xlApp.Workbooks.Open(sFile)            ' WORKBOOK TO OPEN THE EXCEL FILE.
        xlWorkSheet = xlWorkBook.Worksheets("Sheet1")       ' THE SHEET WITH THE DATA.

        With dataGridView1
            .Rows.Clear()
            .Columns.Clear()
        End With

        ' FIRST, CREATE THE DataGridView COLUMN HEADERS.
        Dim iCol As Integer
        For iCol = 1 To xlWorkSheet.Columns.Count
            If Trim(xlWorkSheet.Cells(1, iCol).value) = "" Then
                Exit For        ' BAIL OUT IF REACHED THE LAST COL.
            Else
                Dim col = New DataGridViewTextBoxColumn()
                col.HeaderText = xlWorkSheet.Cells(1, iCol).value
                Dim colIndex As Integer = dataGridView1.Columns.Add(col)    ' ADD A NEW COLUMN.
            End If
        Next

        ' ADD A BUTTON AT THE LAST COLUMN IN EVERY ROW.
        Dim btn = New DataGridViewButtonColumn()
        btn.HeaderText = ""
        btn.Text = "Save Data"
        btn.Name = "btSave"
        btn.UseColumnTextForButtonValue = True
        dataGridView1.Columns.Add(btn)

        ' ADD ROWS TO THE GRID USING EXCEL DATA.
        Dim iRow As Integer
        For iRow = 2 To xlWorkSheet.Rows.Count
            If Trim(xlWorkSheet.Cells(iRow, 1).value) = "" Then
                Exit For        ' BAIL OUT IF REACHED THE LAST ROW.
            Else
                ' CREATE A STRING ARRAY USING THE VALUES IN EACH ROW OF THE SHEET.
                Dim row As String() = New String() { _
                    xlWorkSheet.Cells(iRow, 1).value, _
                    xlWorkSheet.Cells(iRow, 2).value.ToString(), _
                    xlWorkSheet.Cells(iRow, 3).value}

                ' ADD A NEW ROW TO THE GRID USING THE ARRAY DATA.
                dataGridView1.Rows.Add(row)
            End If
        Next

        xlWorkBook.Close() : xlApp.Quit()

        ' CLEAN UP. (CLOSE INSTANCES OF EXCEL OBJECTS.)
        System.Runtime.InteropServices.Marshal.ReleaseComObject(xlApp) : xlApp = Nothing
        System.Runtime.InteropServices.Marshal.ReleaseComObject(xlWorkBook) : xlWorkBook = Nothing
        System.Runtime.InteropServices.Marshal.ReleaseComObject(xlWorkSheet) : xlWorkSheet = Nothing
    End Sub

    Protected Overrides Function ProcessCmdKey(ByRef msg As System.Windows.Forms.Message, _
            ByVal keyData As System.Windows.Forms.Keys) As Boolean

        If keyData = Keys.Enter Then
            SendKeys.Send("{TAB}")      ' MOVE NEXT CELL WHEN YOU PRESS ENTER KEY.
            Return True
        Else
            Return MyBase.ProcessCmdKey(msg, keyData)
        End If
    End Function

    ' SAVE MODIFIED OR NEW DATA TO THE EXCEL SHEET.
    Private Sub dataGridView1_CellContentClick(sender As Object, _
        e As System.Windows.Forms.DataGridViewCellEventArgs) _
                Handles dataGridView1.CellContentClick

        ' EVERY ROW HAS A BUTTON AT THE LAST COLUMN.
        ' SAVE THE DATA IN EXCEL AFTER CLICKING THE BUTTON.

        Dim ourGrid = DirectCast(sender, DataGridView)

        If TypeOf ourGrid.Columns(e.ColumnIndex) Is DataGridViewButtonColumn AndAlso e.RowIndex >= 0 Then

            xlApp = New Excel.Application
            xlWorkBook = xlApp.Workbooks.Open(sFileName)
            xlWorkSheet = xlWorkBook.Worksheets("Sheet1")

            ' CHECK IF THE FIRST COLUMN IS ReadOnly.
            ' THIS IS TO ENSURE THAT YOU MODIFY EXISTING DATA IN EXCEL.
            If dataGridView1.Rows(e.RowIndex).Cells(0).ReadOnly = True Then
                If Trim(xlWorkSheet.Cells(e.RowIndex + 2, 1).value) = dataGridView1.Rows(e.RowIndex).Cells(0).Value Then
                    ' MODIFY THE DATA.
                    xlWorkSheet.Cells(e.RowIndex + 2, 2).value = _
                        dataGridView1.Rows(e.RowIndex).Cells(1).Value   ' FIRST COLUMN.
                    xlWorkSheet.Cells(e.RowIndex + 2, 3).value = _
                        dataGridView1.Rows(e.RowIndex).Cells(2).Value   ' SECOND COLUMN.
                End If
            Else
                ' ADD NEW EMPLOYEE DATA IN A NEW ROW IN EXCEL.
                xlWorkSheet.Cells(e.RowIndex + 2, 1).value = _
                    dataGridView1.Rows(e.RowIndex).Cells(0).Value
                xlWorkSheet.Cells(e.RowIndex + 2, 2).value = _
                    dataGridView1.Rows(e.RowIndex).Cells(1).Value
                xlWorkSheet.Cells(e.RowIndex + 2, 3).value = _
                    dataGridView1.Rows(e.RowIndex).Cells(2).Value
            End If

            xlWorkBook.Close() : xlApp.Quit()

            ' CLEAN UP. (CLOSE INSTANCES OF EXCEL OBJECTS.)
            System.Runtime.InteropServices.Marshal.ReleaseComObject(xlApp) : xlApp = Nothing
            System.Runtime.InteropServices.Marshal.ReleaseComObject(xlWorkBook) : xlWorkBook = Nothing
            System.Runtime.InteropServices.Marshal.ReleaseComObject(xlWorkSheet) : xlWorkSheet = Nothing
        End If
    End Sub

    Private Sub dataGridView1_RowStateChanged(sender As Object, _
        e As System.Windows.Forms.DataGridViewRowStateChangedEventArgs) _
            Handles dataGridView1.RowStateChanged

        ' MAKE THE FIRST CELL (WITH EMPLOYEE NAME) READ ONLY.
        If Trim(e.Row.Cells(0).Value) <> "" Then
            e.Row.Cells(0).Style.ForeColor = Color.Gray
            e.Row.Cells(0).ReadOnly = True
        End If
    End Sub
End Class
There may be other ways to deal with Excel data using a DataGridView in a Windows Forms application. This is one way you can do it. I think its simple.
The example does not explain a typical CRUD operation. It however gives you an idea about how you can import data from Excel file into a DataGridView, manipulate the data or create new data in the Grid and finally save the new or modified data back to the Excel sheet.
You can add other controls to the DataGridView, like binding it with a Combo Box or add images etc. to do other complex operations.
