
Please see this image to understand what I mean.
1) Manually insert (or embed) an Object in Outlook from Excel
Typically, you can follow these steps to manually insert an object into an Outlook email.
- Open Ms-Outlook. Click the New Email tab (New in Outlook 2007) to create a new email message.
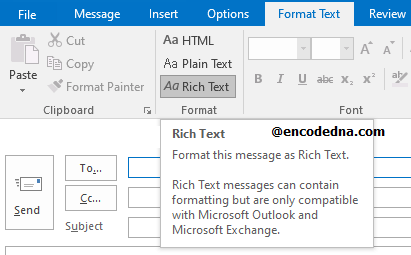
- Click "Format Text" tab from the top menu and click the Rich Text button. Since we want to add an Excel object, we have to change the format from default, which is HTML to Rich Text.
Note: If you are still using Outlook 2007, then click the "Option" tab (instead of Format Text tab).
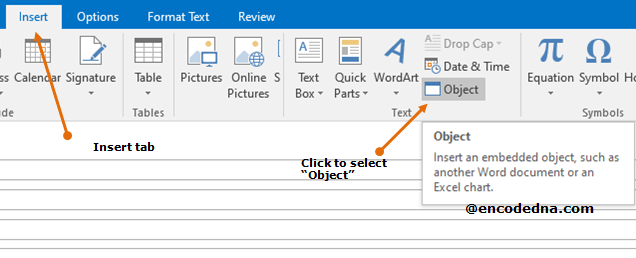
- Next, click the "Insert" tab from the top menu. Find the Object option and click it.
- It will open an "Object" dialog box. Click the Create from File tab.
- Browse the file you want to insert, such as an Excel file. Choose the Display as icon check box and click OK.

- Done! Now add To email id, a Subject line and Send the email.
2) Macro to Insert an Object from File in Outlook
Now, I'll show you how you can automate the entire process that I have explained above, using a simple Macro.
Let us assume, you have file name "Books.xlsx" in the D:\ drive.
Here's the macro.
Option Explicit

Private Sub CommandButton1_Click()
    On Error GoTo ErrHandler

    ' Set Outlook object.
    Dim objOutlook As Object
    Set objOutlook = CreateObject("Outlook.Application")

    ' Create email object.
    Dim objEmail As Object
    Set objEmail = objOutlook.CreateItem(olMailItem)

    With objEmail
        .To = "arunbanik@rediffmail.com, arun@hotmail.com"     ' Assign email ids to the property.
        .Subject = "This is a text message from Arun"
        .BodyFormat = olFormatRichText                         ' Change the body format to Rich Text. (the default is HTML)
        .Body = "Hi, there. Hope you are doing well."
        ' Open outlook for display.
            ' (Replace Display with Send, when you want to send the email.)
        .Display
    End With

    ' Clear all objects.
    Set objEmail = Nothing:    Set objOutlook = Nothing

    ' Once the emailing paramters are set and outlook is ready,
    ' we'll insert or embed an object to the mail message.
    insertExcelObject
ErrHandler:
    '
End Sub

' Insert an Excel file as Object.
Sub insertExcelObject()
       Const sFileName As String = "d:\Books.xlsx"          ' The file that we'll insert as object.
       Dim objRng As Object

        If TypeName(ActiveWindow) = "Window" Then
            If ActiveInspector.IsWordMail And ActiveInspector.EditorType = olEditorWord Then
                Set objRng = ActiveInspector.WordEditor.Application.Selection

                objRng.InlineShapes.AddOLEObject _
                    ClassType:="Excel.Sheet", _
                    DisplayAsIcon:=True, _
                    IconFileName:="EXCEL.EXE", _
                    IconLabel:=sFileName, _
                    fileName:=sFileName
           End If
       End If
End Sub
Here's the output. 👇

Note: 👉 For more on how to send email from Excel using VBA, you can see this example.
What Is This Macro Doing?
Let's break down the macro into a few simple steps.
Inside the button's click event, I'm creating two objects:
- objOutlook – Represents the Outlook application, which we use to create and send an email.
- objEmail – Represents the email message itself, where we set the recipient, subject, body, and other properties.
Next, I use objEmail to assign values to properties such as "To" and "Subject". One important property is BodyFormat, which determines the format of the email body, such as plain text, HTML, or Rich Text.
.BodyFormat = olFormatRichText
The default format of the Body (of a message) is HTML. I am changing the format to Rich Text. Or else, I may not be able to embed or insert an Object into email message.
Now, let's understand the insertExcelObect procedure. This is where I am actually embedding an Object to the Outlook message, created from a file, but displaying as an icon. Therefore, I have created an OLE object of type InlineShapes.
Dim objRng As Object
Set objRng = ActiveInspector.WordEditor.Application.Selection
objRng.InlineShapes.AddOLEObject _
The InlineShapes.AddOLEOject method takes few "parameters" like,
- ClassType: Its an Excel file that I am inserting. Therefore, the type is "Excel.Sheet".
- DisplayAsIcon: Yes, we want to display an Excel icon in the message. Hence, its "True".
- IconFileName: Here we'll assign the application (or an exe) that contains the icon we want to show. Since its an Excel file, I have assigned EXCEL.EXE.
Note: If you want to insert the Word icon, assign WORD.EXE.
- IconLabel: I want to add a label to icon for better understanding. Therefore, I have assigned the "filename" itself.
- fileName: Finally, the file name.