Last Updated: 20th May 2025
In Excel, assigning meaningful names to cells or ranges enhances data comprehension and organization. Named cells and ranges provide additional advantages beyond simple identification. In this guide, I’ll show you how to create Named Cells and Named Ranges in Excel, utilize these names in formulas and apply them for efficient data validation.Naming a cell in Excel is very simple. By default, cells have names, such as A1, A2 etc., which mean Column A, Row 1 and so on. You can name each cell according to your requirement.
Create a Named Cell
Creating a named cell in Excel is simple. Start by selecting the cell you want to name or setting focus on it. Then, click the Name Box located before the formula bar, enter a meaningful name, and press the Enter key to confirm. Once saved, Excel recognizes and stores this name, allowing you to use it seamlessly in formulas and data validation.
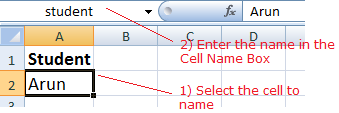
Now, the cell A2 has a new name called student. Excel will identify the cell with its name now. You can now use the name in a formula etc.
Create a Named Range
Naming a range is very similar to naming a cell. In a range, you will have multiple cells or a group of cells.
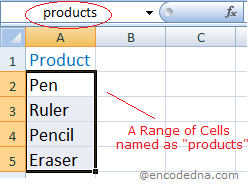
Note: The "Name" of a cell or Range should be a single word. Do not add a space between words. If you want to add two words then use an underscore (_) or hyphen (-).
Using a Named Range in a Formula
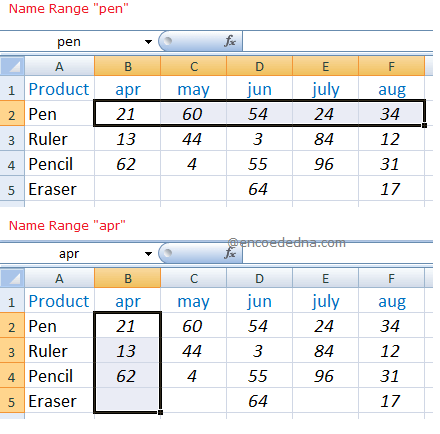
You can use a Named Range in a formula. This is very useful. For example, I have a monthly sales data for each product in my Excel workbook. I want to check the total sales of a particular product for a month and for the entire year.
First, I’ll create names for a range of data. The first range is named "pen" and second is named "apr" (or "april_sales"). See the image below. Similarly, give names to other product range.
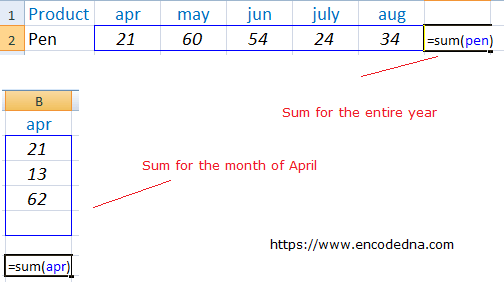
Next, I’ll use the SUM() function (as formula) with the "names" to get the sum of all the Pens for the entire year and the sum of pens for a particular month. You can add the formula at the end of the table. For example,
1) To get the sum of pens for the entire year: =SUM(pen)
2) To get the sum of pens for the month of April: =SUM(apr)
Using a Named Range for Data Validation
You can leverage a Named Range in Excel for Data Validation to create dynamic dropdown lists or combo boxes. This feature ensures users select only predefined values, reducing errors and improving data consistency.
For instance, if I want to create a dropdown list for all my products, using a Named Range guarantees that users can only choose from the designated list, eliminating the risk of incorrect entries.
I have already created a Products named range in the above example. I’ll use this name in this example too.
Note: You can use a named range "anywhere" in your workbook. Therefore, I’ll create the dropdown list in "Sheet2", just to prove my point.
Now, follow these steps.
a) Go to Sheet2 (or any other sheet) and set focus on A2 cell. Since, I want to add a dropdown list in this cell.
b) From the top menu, click the Data tab and select Data Validation. This will open the Data Validation window.
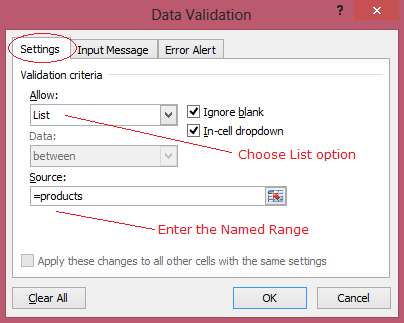
c) Choose the Settings tab and select List (indicates dropdown list) under the Allow option.
d) Finally in the Source box, type =products (the named range). Click OK.
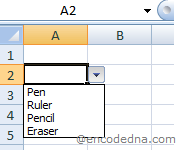
The result: When you set focus in the cell A2, you will see a down arrow next to the cell. You will have to choose a product from the list. If you try to type or enter any other value, Excel will throw an error.
🚀 The advantage of using a named range for data validation is that you can add, edit or remove values from the list, with very little effort.
Add, Edit or Delete Named Range
Simply press Ctrl+F3 and Excel will show you the list of the Named Range you have created. It will open a Name Manager window.
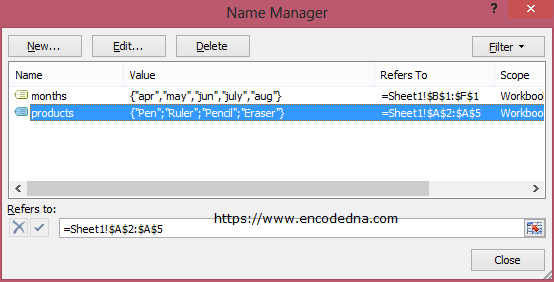
Select a name from the list and choose an option from the top of the window to either edit, delete or create new names.
Now, let's say I want to expand the product range by adding new items.
1) Enter new products starting either from the next row or somewhere between the existing values.
2) Press "Ctrl+F3" to open the "Name Manager" window.
3) Select the "products" name and choose the "Edit…" option. This will open a small window called "Edit Name".
4) Set focus on the third option "Refers to". It will automatically select the range of products.
5) Press the "Shift" key and click on the cells to add more products to the range.
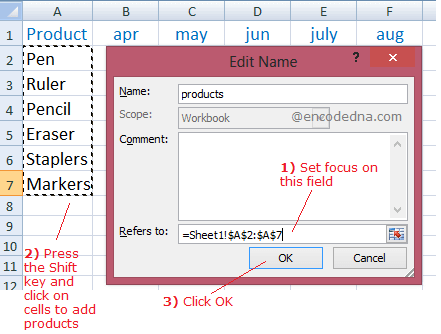
Any changes that you make in the Named Range, will automatically reflect in the dropdown list that we have created.
