Asp.Net MVC does not provide server controls, which means there is no toolbox with drag and drop controls. In MVC, we work with a Model, a Controller and a View. The Controller receives requests from client applications, processes the requests with the help of the Model and finally shows the result using the View.
Let us now create a WebGrid in Asp.Net MVC 4.
Create a Table in SQL Server
I’ll extract data from an SQL Server table and populate the WebGrid with the data. Therefore, first create a table named dbo.Products and add few rows to it.
CREATE TABLE [dbo].[Product](
    [Product_ID] [int] IDENTITY(1,1) NOT NULL,
    [CreateDate] [datetime] NULL,
    [ProductName] [varchar](100) NULL,
    [Brand] [varchar](100) NULL,
    CONSTRAINT [pkProduct_ID] PRIMARY KEY CLUSTERED
    ( [Product_ID] ASC )
)
Add data to the table.
INSERT INTO dbo.Product (CreateDate, ProductName, Brand)
VALUES (GETDATE(), 'Pencil Sharpner', 'Natraj'),
    (GETDATE(), 'Eraser', 'Mono'),
    (GETDATE(), 'Eraser', 'Elxin'),
    (GETDATE(), 'Calculator', 'Parcc'),
    (GETDATE(), 'Eraser', 'Smart'),
    (GETDATE(), 'Pencil', 'Doms'),
    (GETDATE(), 'Pen', 'X-Presso'),
    (GETDATE(), 'Pen', 'Rorito')
It’s a simple list, an inventory of Stationary products. A few extra rows of data will allow you add paging to the WebGrid.
Now, let’s create our MVC application. I am assuming you have MVC 4 installed in your computer.
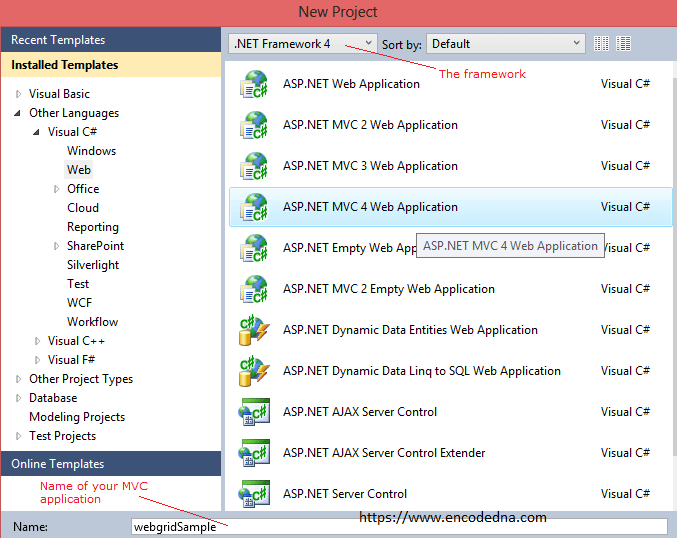
1) Open Visual Studio and from the File menu above, choose New Project. From the New Project window, select Asp.Net MVC 4 Web Application (choose the language you work with, C# or Visual Basic). Give it a name like webgridSample and click OK.
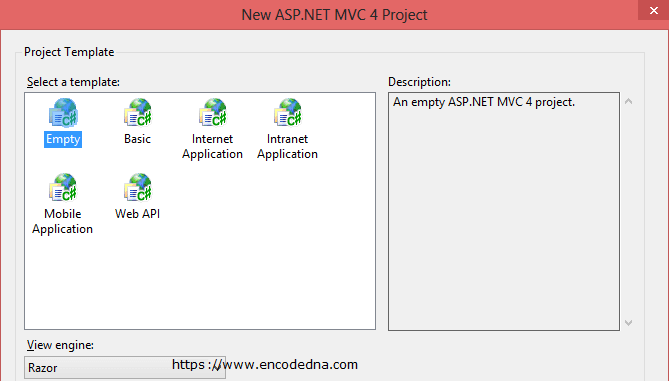
2) Choose Empty template from the New ASP.Net MVC 4 Project window and click the OK button.
• Next, Open the Solution Explorer and you will see few folders like App_Start, Controllers, Models and Views etc. These four folders are important for this project. It has also created some default files in some of the folders.
• We’ll now create the Model class, which will contain some properties similar to the columns we have created in our SQL Server Table above.
Note: At this moment if you run the application, you will see an error on your browser saying, The resource cannot be found. There is no need to panic. Just follow the steps now and after you have created the Controller, this error will go away.
The Model
To create the model class, right click the Models folder in the Solution Explorer window, choose Add and select class. See the image.
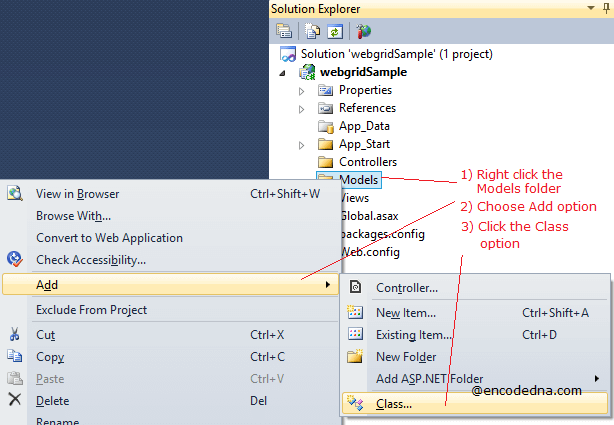
Name the class as modelProducts.cs for C# or modelProducts.vb for Visual Basic.
We are now going to add some properties to the class. These properties will hold data extracted from the database table.
using System;
using System.Collections.Generic;
using System.Linq;
using System.Web;

namespace webgridSample.Models
{
    public class modelProducts
    {
        public int ProductID { get; set; }
        public string ProductName { get; set; }
        public string Brand { get; set; }
    }
}
Option Explicit On

Namespace webgridSample.Models
    Public Class modelProducts
        Public Property ProductID() As Integer
            Get
                Return m_ProductID
            End Get
            Set(value As Integer)
                m_ProductID = value
            End Set
        End Property
        Private m_ProductID As Integer

        Public Property ProductName() As String
            Get
                Return m_ProductName
            End Get
            Set(value As String)
                m_ProductName = value
            End Set
        End Property
        Private m_ProductName As String

        Public Property Brand() As String
            Get
                Return m_Brand
            End Get
            Set(value As String)
                m_Brand = value
            End Set
        End Property
        Private m_Brand As String
    End Class
End Namespace
Now create the Controller.
Controller
The controller is where we set a connection to the database. It also has a Public Function named viewProducts that would query the SQL Server table dbo.products, initialize the Model Properties and return the result to the View.
The procedure for creating a Controller is similar to the way you have created the Model class.
1) Right click the Controllers folder in the Solution Explorer window.
2) Click or roll the mouse over the Add option and select the option Controller. See the image.
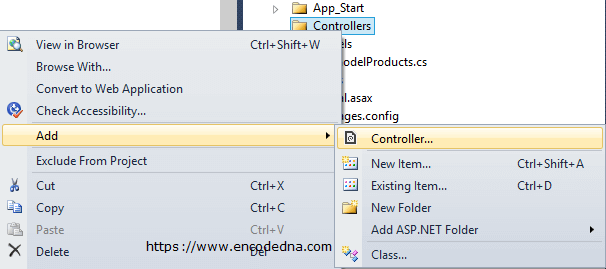
3) It will now open the Add Controller window. Give the controller a name like productsController. The template option must be Empty MVC controller. Click the Add button.
using System;
using System.Collections.Generic;
using System.Linq;
using System.Web;
using System.Web.Mvc;

using webgridSample.Models;
using System.Data.SqlClient;

namespace webgridSample.Controllers
{
    public class productsController : Controller
    {
        const string sConnString = "Data Source=DNA;Persist Security Info=False;" +
            "Initial Catalog=DNA_Classified;User Id=sa;Password=demo;Connect Timeout=30;";

        // LIST OBJECT WILL HOLD AND RETURN A LIST OF PRODUCTS.
        List<modelProducts> ourProducts = new List<modelProducts>();

        public ActionResult viewProducts(modelProducts list)
        {
            using (SqlConnection con = new SqlConnection(sConnString))
            {
                using (SqlCommand cmd = new SqlCommand("SELECT *FROM dbo.Product"))
                {
                    cmd.Connection = con;
                    con.Open();

                    SqlDataReader reader = cmd.ExecuteReader();

                    // POPULATE THE LIST WITH DATA.
                    while (reader.Read())
                    {
                        ourProducts.Add(new modelProducts
                        {
                            ProductID = Convert.ToInt32(reader["Product_ID"]),
                            ProductName = reader["ProductName"].ToString(),
                            Brand = reader["Brand"].ToString()
                        });
                    }

                    con.Close();
                }
            }

            return View(ourProducts);
        }
    }
}
Option Explicit On
Imports webgridSample.webgridSample.Models
Imports System.Data.SqlClient

Namespace webgridSample
    Public Class productsController
        Inherits System.Web.Mvc.Controller

        Const sConnString As String = "Data Source=DNA;Persist Security Info=False;" & _
            "Initial Catalog=DNA_Classified;User Id=sa;Password=demo;Connect Timeout=30;"

        Dim ourProducts As New List(Of modelProducts)()

        Function viewProducts(list As modelProducts) As ActionResult
            Using con As SqlConnection = New SqlConnection(sConnString)
                Using cmd As SqlCommand = New SqlCommand("SELECT *FROM dbo.Product")
                    With cmd
                        .Connection = con
                        con.Open()

                        Dim reader As SqlDataReader = cmd.ExecuteReader()

                        ' POPULATE THE LIST WITH DATA.
                        While reader.Read()
                            ourProducts.Add(New modelProducts() With { _
                                .ProductID = reader("Product_ID").ToString(), _
                                .ProductName = reader("ProductName").ToString(), _
                                .Brand = reader("Brand").ToString() _
                             })
                        End While

                        con.Close()
                    End With
                End Using
            End Using

            Return View(ourProducts)
        End Function
    End Class
End Namespace
We’ll now create the View.
View
Open the Solution Explorer window.
1) Right click the Views folder, add a New Folder, and rename it as products. I am creating the View inside products folder.
2) Again, right click the products folder, roll the mouse over the Add option, and click the View option. See the image.
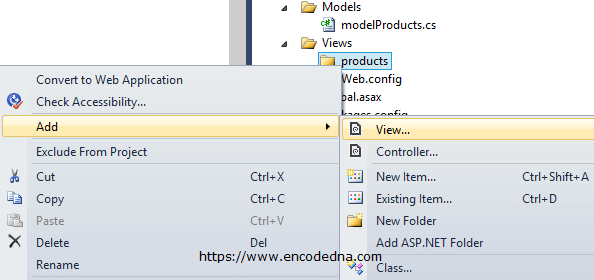
3) Give the view a name like viewProducts and click the Add button.
4) Finally add the below code.
@{
    ViewBag.Title = "viewProducts";
    WebGrid objWG = new WebGrid(Model, rowsPerPage:5); // CREATE AN OBJECT OF WebGrid CLASS.
}

<h2>viewProducts</h2>
@objWG.GetHtml()
@Code
    ViewData("Title") = "Our Products Inventory"
    Dim objWG As New WebGrid(Model, rowsPerPage:=5)
End Code

<h2>Products Inventory</h2>
@objWG.GetHtml()
Now run the application. The browser still says, The resource cannot be found. The solution lies inside the RouteConfig.cs file in MVC 4.
In earlier versions, they had to make changes in the Global.asax file to get rid of this error.
Solving the Error: The resource cannot be found
When you have created the project in the beginning, it added some features to the application. These are default features in MVC 4. You have to manually change or add new properties to it.
• Open the Solution Explorer again and expand the App_Start folder.
• Open the RouteConfig.cs file and update the controller and action values.
Default route values ...
defaults: new { controller = "Home", action = "Index", id = UrlParameter.Optional }
Change to ...
defaults: new { controller = "products", action = "viewProducts", id = UrlParameter.Optional }
For Visual Basic programmer too, just change the values.
Remember: The ActionResult method named viewProducts that we have declared in the Controller is a Public method. In-addition, the View that we have created (inside the Views -> products folder) is also named as viewProducts.
Now, run the application. If everything goes well, you will see an output like this.
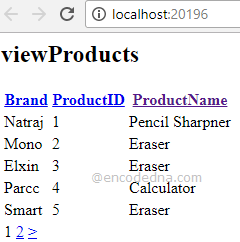
The result is … somewhat random. It shows the Brand first, followed by ProductID and finally the ProductName.
However, it has applied paging (I have declared rowsPerPage:=5) at the end of the grid. In-addition, you can sort the grid rows by clicking its headers.
We can rearrange the output of WebGrid according to our choice. For example, in our View we can explicitly add or remove columns or change the Title and add other features.
Adding Column Name to the View (C# Code)
@{
    ViewBag.Title = "Our Products Inventory";
    WebGrid objWG = new WebGrid(Model, rowsPerPage:5);
}

<h2>Products Inventory</h2>
@objWG.GetHtml(
    columns: objWG.Columns (
        objWG.Column("ProductID"),
        objWG.Column("ProductName"),
        objWG.Column("Brand")
    )
)
Adding Column Name to the View (Visual Basic)
@Code
    ViewData("Title") = "Our Products Inventory"
    Dim objWG As New WebGrid(Model, rowsPerPage:=5)
End Code

<h2>Products Inventory</h2>
@objWG.GetHtml(
    columns:=objWG.Columns(
            objWG.Column("ProductID"),
            objWG.Column("ProductName"),
            objWG.Column("Brand")
        )
    )
The View is just like an HTML page. You can make changes to the view while the project is running.
Adding Style to the WebGrid
We can add style to the Grid to align the rows and column, add fonts and colors to the texts etc. Simply update the View like this.
@{
    ViewBag.Title = "Our Products Inventory";
    WebGrid objWG = new WebGrid(Model, rowsPerPage:5, canSort:false);  // SET COLUMN SORTING TO FALSE (ITS OPTIONAL).
}

<style>
    h2 {
        font: 20px Georgia;
    }
    .grid {
        font: 17px Calibri;
        width: 400px;
        background-color: #FFF;
        border: solid 1px #CD6736;
    }
    .grid td, th {
        padding: 2px;
        border: solid 1px #CD6736;
        text-align: center;
        text-transform: capitalize;
    }
    .grid-header
    {
        background-color: #CD6736;
        color: #FFF;
        text-align: left;
    }
    .grid-footer
    {
        color: #000;
        font: 17px Calibri;
        text-align: left;
    }
</style>

<h2>Products Inventory</h2>
@objWG.GetHtml(
    columns: objWG.Columns (
        objWG.Column("ProductID", "Product ID"),
        objWG.Column("ProductName", "Product Name"),
        objWG.Column("Brand")
    ),
    tableStyle:"grid",
    headerStyle:"grid-header",
    footerStyle: "grid-footer"
)s
Final Output
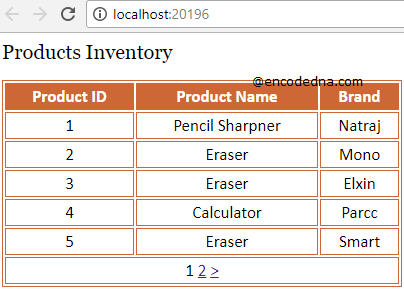
I have now updated the Column headers. See the space between the names Product ID and Product Name. You can give the columns any name. Along with it, I have added few parameters inside the GetHtml() method like tableStyle, headerStyle and footerStyle.
You can add more parameters to the GetHtml() method like, alternatingRowStyle, nextText, previousText etc.
Note: Use the caption parameter in the GetHtml() method instead of the <h2> tag. For example,
@objWG.GetHtml(
    columns: objWG.Columns (
        objWG.Column("ProductID", "Product ID"),
        objWG.Column("ProductName", "Product Name"),
        objWG.Column("Brand")
    ),
    caption: "Products Inventory"
)
