This will add an extra level of security to the application's connection strings.
A typical connection string in an Asp.Net web.config file looks like this.
<connectionStrings>
    <add name="ENCODEDNAConnectionString" connectionString="Data Source=DNA;Initial Catalog=DNA_Classified;User ID=sa;Password=dummy"
        providerName="System.Data.SqlClient" />
</connectionStrings>
Steps to Encrypt Connection Strings in Web.Config File
You must login as Administrator to perform this function. The functionalities are only provided to the administrator. Therefore, make sure you have access to it.
1) Open Visual Studio Command Prompt from Start menu. I am using Windows 8 and this is how it looks like.


2) Encrypt Connection String using aspnet_regiis.exe Application – The aspnet_regiis.exe application is installed by default in your computer when you have installed Visual Studio. If you are using other versions of Visual Studio, you must first check if this application is installed.
Run this application in your command line. This is to ensure if the application installed and its executing properly.

If it executes, it will show you a list of Asp.Net Registration Options. In the list you will find the options -pef and -pdf for encryption and decryption.
3) The encryption command – The application aspnet_regiis.exe requires three parameters. See the syntax.
aspnet_regiis.exe –pef "connectionStrings" "path of the folder containing the Web.Config file"
• -pef: Performs an Encryption action
• connectionStrings: It is case sensitive. This represents the conectionStrings in the Web.Config file.
• path: The complete path of the folder where the config file is situated in the project.
For example,

It should execute without any errors. If successful it will show a message …
Encrypting configuration section…
Succeeded!
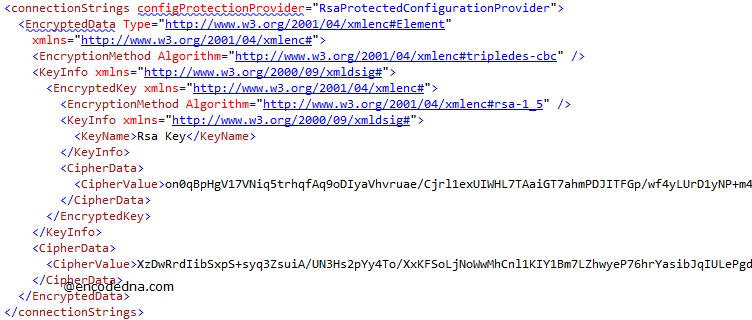
Open the Web.Config file to see the encryption. It might look somewhat like this.

Every time you run this command, it will create a new ChipherValue in your Web.Config file.
Note: If you have already used the connection string in your application, Visual Studio will automatically decrypt connection string for you. Simply run the application to see if its connecting properly.

Now, you also need to Decrypt the encryption to make changes (if any) in the connection string. Lets see how this is done.
Steps to Decrypt Connection Strings in Web.Config File
The Decryption process is very similar to the Encryption process, which I have explained above. However, there’s a slight change in the command.
You need to use the aspnet_regiis.exe application in your Visual Command Prompt, with the -pdf option. For example, to decrypt the connection string;

If there’s no error, it will show a message,
Decrypting configuration section…
Succeeded!
Open the config file to check. The connection string should now be readable.
