One of the major changes that Angular made in its 4+ version is that it moved animation functions from @angular/core library (in Angular 2) to its own animation library. This helps reduce the size of your production bundle.
Setting up Angular
If you are new to Angular, then you’ll have to first set up your development environment. Please download and install Node.js and NPM on your machine. It’s a 10 mb file. Follow the installation procedures.
To test NPM, open Windows Command Prompt (or cmd) and type node -v in the command line to check the latest version of node installed in your computer.
I have node version v6.11.4 installed on my computer.
Then, install Angular CLI globally. The installation takes time.
npm install -g @angular/cli
Ref: Angular QuickStart
If the set up is done (successfully), lets create the project.
Create Angular Project
Open the cmd prompt and go to the folder where you want to create your project. Type this command.
ng new basicAnimation
It will create a folder named basicAnimation. Please don’t panic (or close the windows command prompt) if it takes time. Its normal, as the Angular CLI installs npm packages and its dependencies.
Once the folder is created, go to the folder.
cd basicAnimation
Note: Follow these steps if you are new to Angular. Else, you can go see the components below.
Launch the Server
You will have to launch the server to check if everything is installed properly. Type this command in cmd.
ng serve --open
or
ng serve --o
This will automatically open the browser on https://localhost:4200 and will load the page.
It ensures that @angular/cli has created the app (the project folder with the .ts files etc.) successfully.
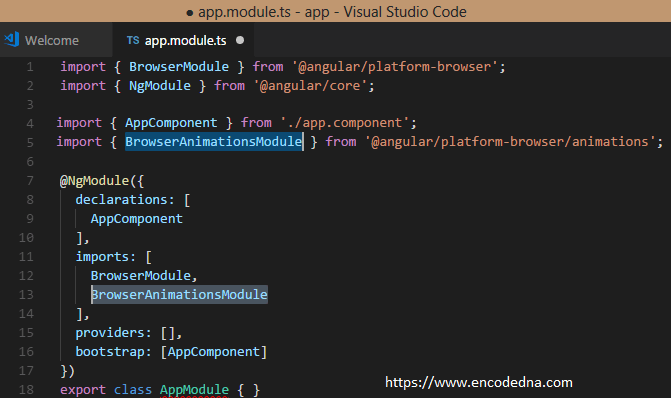
Import BrowserAnimationsModule to the Project
To work with Angular animation, you’ll have to import BrowserAnimationsModule. Open the file named app.module.ts under basicAnimation/src/app/ folder. Copy and paste the code in the file (on the top).
import { BrowserAnimationsModule } from '@angular/platform-browser/animations';
In the same file, you have the NgModule decorator array. Add the array with this value,
BrowserAnimationsModule
See this image.

Create Animation Component
Animations in Angular works by listening on state changes and these changes are triggered using the trigger function. Therefore, we’ll have to import few functions related to animation, like the trigger, state, animate and transition to our component.
Open the component file named app.component.ts in your editor. You can find this file in basicAnimation/src/app/app.component.ts folder. Add the below code.
import {trigger, state, style, animate, transition} from '@angular/animations';
The app.component.ts file would look like this.
import { Component } from '@angular/core';
import {trigger, state, style, animate, transition} from '@angular/animations';

@Component({
  selector: 'app-root',
  templateUrl: './app.component.html',
  styleUrls: ['./app.component.css'],
  animations:
  [
    trigger('triggerBackgroundChange',
    [
      state ('first', style({'background-color':'yellow', 'color' : 'black'})),
      state ('second', style({'background-color':'red', 'color' : 'white'})),
      transition ('* => *', animate(3000))
    ])
  ]
})
export class AppComponent {
  title = 'Basic Animation in Angular';
  color: string='first';
  changeColor(){
    if (this.color == 'first')
      this.color = 'second';
    else
      this.color = 'first';
  }
}
The @Component decorator will have some default properties. I have now added the animations property to it.
animations: [
...
]
We have imported the trigger function in the beginning of the file. I have then added a trigger() function with the name triggerBackgroundChange to the animation property. Inside the trigger() function, I also have two states and a transition.
Both the states have unique names (first and second) as the first parameter, along with the style function as the second parameter.
state ('first', style({'background-color':'yellow', 'color' : 'black'})),
state ('second', style({'background-color':'red', 'color' : 'white'})),
The style has background color and fore color, which I wish to toggle (or change) animatedly for each click on the element.
The Transition
The transition() function has two parameters.
1) The first parameter is * => *, to capture state change between any state.
2) The second parameter has the animate() function with a value 3000 milliseconds or just 3 seconds. This indicates that every state change (background color) occurs animatedly with in a period of 3 seconds.
The Calling Function inside Our Component (app.component.ts)
I also a User Defined Function called changeColor(). The function is called when a user clicks on the element (a <div>), which will then trigger the different states in the component. This function has conditions.
export class AppComponent {
  title = 'Basic Animation in Angular';
  color: string='first';
  changeColor(){
    if (this.color == 'first')
      this.color = 'second';
    else
      this.color = 'first';
  }
}
Attach Animation to the Template
Once our component with the animation properties is ready, we need to attach it to the element or the template.
Open app.commponent.html file. Copy and paste the below code to the file.
<div class="container">
  <h1>
    {{title}}!
  </h1>

  <div [@triggerBackgroundChange]='color' class="circle" (click)='changeColor()'>
    Click Me
  </div>
</div>
I have attached the trigger to the <div> element, with the value color. Look at the app.component.ts file again. I have the (click) property to call the changeColor() function.
Add Style in app.component.css
However, it’s a circle that I wish to show on my web page. Therefore we have to style the <div> element to make is look like a circle. I have a class named circle attached to the <div> element.
You can add style properties to the app.component.css file. The file is inside the src/app/ folder.
.container {
    text-align: center;
    width: 300px;
    font-family: 'Gill Sans', 'Gill Sans MT', Calibri, 'Trebuchet MS', sans-serif;
    font-size: 12px;
}
.circle {
    width: 100px;
    height: 100px;
    line-height: 100px;
    border-radius: 50%;
    font-size: 15px;
    text-align: center;
    background: yellow;
    float: none;
}
Remember, you can add inline styles too to the elements.
Its not very difficult to master and work in Angular. With a little practice you can understand the powerful features Angular provides. Few animation functions like transition, styles etc. resembles CSS3 properties that you might have used in your projects. However, its implementation is different here.
