Last update: 13th May 2024
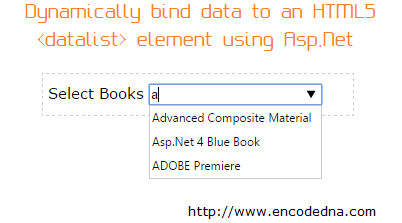
The HTML Datalist element is an alternative to many JavaScript driven AutoComplete widgets. In one of my previous article, I have briefly explained about HTML5 Datalist element. Its worth reading.In this article, I'll show you how to bind Datalist to a DataSource dynamically using code behind procedures using C# and VB.
The previous article that I mentioned above, focused on some HTML5 elements useful for web developement.
The Datalist’s features are very basic, and there is no option (when I wrote this article) to bind it directly to a DataSource like the SQLDataSource. You cannot style it either. However, I have found a quick workaround.
A Workaround
First, we will create a table using Asp.Net DataTable. The advantage of using a DataTable is that it is a temporary table. It is perfect of our example, because we need a single column table (with data) for the Datalist.
➡️ DataTable
Later, we will loop through DataTable rows and add values to the Datalist using its InnerHtml property.
Add "datalist" to the webpage.
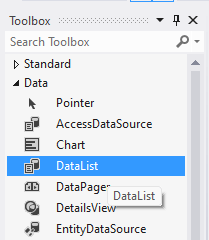
How to add DataList control in Asp.Net?
You can find the "DataList" control in the toolbox. Open the web page and go to the Design mode. Now click the "Toolbox" icon or press Ctrl+Alt+X to open the toolbox. Select the "Data" option and double to select "DataList".

Here's the markup with the datalist.
<!DOCTYPE html>
<html>
<body>
    <form id="form1" runat="server">
        <div>
            Select Books <input list="books">
                <datalist id="books" runat="server"></datalist>
        </div>
    </form>
</body>
</html>
Populate DataList using C#
Now let's populate the "datalist" using a simple code behind procedure.
using System;

public partial class _Default : System.Web.UI.Page
{
    System.Data.DataTable mytable = new System.Data.DataTable();

    protected void Page_Load(object sender, EventArgs e)
    {
        createBooksTable();
        populateDataList();
    }

    private void createBooksTable()
    {
        System.Data.DataColumn tColumn = null;
        // TABLE COLUMNS.

        tColumn = new System.Data.DataColumn("Book ID", System.Type.GetType("System.String"));
        mytable.Columns.Add(tColumn);

        mytable.Rows.Add("Advanced Composite Material");
        mytable.Rows.Add("Asp.Net 4 Blue Book");
        mytable.Rows.Add("Teaching Science");
        mytable.Rows.Add("Circuit Bending");
        mytable.Rows.Add("ADOBE Premiere");
    }

    private void populateDataList()
    {
         for (int i = 0; i <= mytable.Rows.Count - 1; i++)
        {
            // ADD VALUES TO <datalist>.
            books.InnerHtml = books.InnerHtml + System.Environment.NewLine +
                String.Format("<option value='{0}'>", mytable.Rows[i][0]);
        }
    }
}
Option Explicit On

Partial Class _Default
    Inherits System.Web.UI.Page

    Dim mytable As New Data.DataTable()

    Protected Sub form1_Load(ByVal sender As Object, ByVal e As System.EventArgs)
        Handles form1.Load

        createBooksTable()
        populateDataList()
    End Sub

    Private Sub createBooksTable()
        Dim tColumn As Data.DataColumn          ' TABLE COLUMNS.

        tColumn = New Data.DataColumn("Books", System.Type.GetType("System.String"))
        mytable.Columns.Add(tColumn)

        mytable.Rows.Add("Advanced Composite Material")
        mytable.Rows.Add("Asp.Net 4 Blue Book")
        mytable.Rows.Add("Teaching Science")
        mytable.Rows.Add("Circuit Bending")
        mytable.Rows.Add("ADOBE Premiere")
    End Sub

    Private Sub populateDataList()
        For i As Integer = 0 To mytable.Rows.Count - 1
            'ADD VALUES TO <datalist>.
            books.InnerHtml = books.InnerHtml & vbCrLf & _
                [String].Format("<option value='{0}'>", mytable.Rows(i)(0))
        Next
    End Sub
End Class
Using a similar method, we can extract data from a database table by creating a dataset and fill the Datalist with the extracted values. An upgraded version of this element will not only eliminate the need for JavaScript or JQuery driven autocomplete widgets, also help developers to quickly add and bind the Datalist element with any DataSource.
