
Last updated: 19th June 2024
The Windows Forms CheckedListBox control efficiently displays data in a structured list format, allowing users to check or uncheck individual items seamlessly. By default, each item is accompanied by a small checkbox, which remains unchecked until the user selects it. This functionality makes CheckedListBox a versatile choice for managing interactive lists in Windows applications.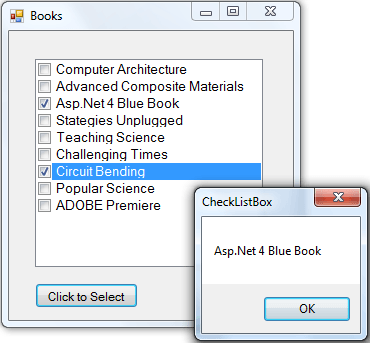
CheckedListBox Syntax
CheckedListBox.Items.Add()
How to populate CheckedListBox with items?
To populate a CheckedListBox with items in Windows Forms, you have a few options. You can add items manually or dynamically at runtime, or bind the control to a data source.
1) Manually Add Items
You can directly add items to the CheckedListBox using the Items.Add() method.
CheckedListBox.Items.Add("Computer Architecture")
CheckedListBox.Items.Add("Popular Science")
2) Populate from a Database
If you want to populate the CheckedListBox dynamically from an SQL Server database, you can use the following approach.
Add CheckedListBox
On the windows form, add a CheckedListBox and a Button control. The Click event of the button will iterate through the listbox and show the checked items only. Items in the CheckedListBox will be populated during the loading of the form and data will be extracted from an SQL server database table called dbo.books.
using System;
using System.Data;
using System.Windows.Forms;
using System.Data.SqlClient;

namespace CheckListBox
{
    public partial class Form1 : Form
    {
        public Form1()
        {
            InitializeComponent();
        }

        SqlDataAdapter SqlAdapter = null;
        DataSet ds = new DataSet();

        private void Form1_Load(object sender, EventArgs e)
        {
            Populate_DataSet();
            FillCheckListBox();
        }

        private void Populate_DataSet()
        {
            string s_ConnString = "Data Source=DNA_CLASSIFIED;Persist Security Info=False;Initial " +
                "Catalog=BookStore;User Id=sa;Password=123;Connect Timeout=30;";

            using (SqlConnection con = new SqlConnection(s_ConnString))
            {

                string sBooks = "SELECT *FROM dbo.BOOKS";

                SqlAdapter = new System.Data.SqlClient.SqlDataAdapter(sBooks, con);
                SqlAdapter.Fill(ds, "BookName");
            }
        }

        private void FillCheckListBox()
        {
            DataRow row = null;
            int iRowCnt = 0;

            lstBooks.Items.Clear();

            foreach (DataRow row_1 in ds.Tables["BookName"].Rows)
            {
                row = row_1;
                lstBooks.Items.Add(ds.Tables["BookName"].Rows[iRowCnt][1]);
                iRowCnt = iRowCnt + 1;
            }
        }

        private void btSelect_Click(object sender, EventArgs e)
        {
            if (lstBooks.Items.Count > 0)
            {
                for (int i = 0; i <= lstBooks.CheckedItems.Count - 1; i++)
                {
                    string s_Value = lstBooks.CheckedItems[i].ToString();
                    MessageBox.Show(s_Value);
                }
            }
        }

    }
}
Option Explicit On

Imports System.Data.SqlClient

Public Class Form1

    Dim SqlAdapter As SqlDataAdapter
    Dim ds As New DataSet

    Private Sub Form1_Load(ByVal sender As Object, ByVal e As System.EventArgs) Handles Me.Load
        Populate_DataSet()
        FillCheckListBox()
    End Sub

    Private Sub Populate_DataSet()

        Dim s_ConnString = "Data Source=DNA_CLASSIFIED;Persist Security Info=False;" & _
            "Initial Catalog=BookStore;User Id=sa;Password=123;Connect Timeout=30;"

        Using con As New SqlConnection(s_ConnString)

            Dim sBooks As String = "SELECT *FROM dbo.BOOKS"

            SqlAdapter = New System.Data.SqlClient.SqlDataAdapter(sBooks, con)
            SqlAdapter.Fill(ds, "Books")
        End Using

    End Sub

    Private Sub FillCheckListBox()

        Dim row As DataRow
        Dim iRowCnt As Integer = 0

        lstBooks.Items.Clear()

        For Each row In ds.Tables("Books").Rows
            lstBooks.Items.Add(ds.Tables("Books").Rows(iRowCnt).Item(1))
            iRowCnt = iRowCnt + 1
        Next

    End Sub

    Private Sub btSelect_Click(ByVal sender As System.Object, ByVal e As System.EventArgs) _
        Handles btSelect.Click

        If lstBooks.Items.Count > 0 Then
            For i = 0 To lstBooks.CheckedItems.Count - 1
                MsgBox(lstBooks.CheckedItems(i))
            Next
        End If

    End Sub
End Class
After designing and running the program, you may have noticed that selecting checkboxes on the control requires clicking the item twice for it to be properly selected.
This control behaves this way by default—the first click sets the focus on the item, while the second click selects or checks it. This can be frustrating at times, as it effectively doubles the time required to select items. Fortunately, there is a property that allows users to check items with a single click.
CheckListBox Properties
1) Property CheckOnClick
This property is set to indicate that when an item on the CheckedListBox is clicked it must be instantly selected. The property accepts a Boolean value, which is true or false.
C#
CheckedListBox.CheckOnClick= true;
VB.NET
CheckedListBox.CheckOnClick = True
Set the value as true at design time or during the loading of the form. To set the value at design time, select the CheckedListBox in the form design view and right click to open the properties window. Look for CheckOnClick property in the list and choose True from the dropdown list.
So now you know that the default value of this property is False. It has to be explicitly set so that your users do not complaint about this being slow.
2) Property MultiColumn
The MultiColumn property is another useful feature available. When dealing with large lists, displaying them all on a single form can be challenging. Although the control provides both horizontal and vertical scroll bars, it also allows items to be displayed across multiple columns, improving visibility and usability.
This property like the previous one which we have discussed, accepts Boolean values. As usual the value for this property is set a False by default. So we need to set it True explicitly either during design time or at run time.
C#
CheckedListBox.MultiColumn = true;
VB.NET
CheckedListBox.MultiColumn = True
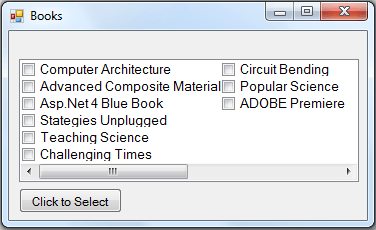
3) Property ColumnWidth
When the MultiColumn property is set to 'True' we also need to define the column width to ensure items are displayed clearly without overlapping, especially when dealing with long strings. To achieve this, we use the ColumnWidth property, which accepts integer values and adjusts the width of each column accordingly—either increasing or shrinking it as needed.
CheckedListBox.ColumnWidth = 200
The MultiColumn property becomes practically visible only when the height of the CheckedListBox is limited, preventing the full list from being displayed. To see this property in action, try reducing the control's height while increasing its width on the form.
The CheckedListBox is an extension of the ListBox control, sharing many similar properties and functionalities. It allows for the display of large lists and provides the ability to check or uncheck items. While we've covered a few key properties, there are many more worth exploring. Feel free to share your thoughts on this control and let us know if you've discovered any features that deserve further discussion on this website.