
💡 Note: This is an old tutorial. I would recommend that you see this tutorial (especially for beginners) with proper step-by-step explaination for the same.
I'll bind the GridView control with a database table using SqlDataSource. Meanwhile, you can go through the below link for an overview of how data binding is done using "SqlDataSource".
Start Microsoft Visual Studio and select File -> New -> Web Site from the top menu.
Add a new website and in the Default.aspx select the Design tab situated at the left bottom. In the design mode, select the Toolbox. From the Toolbox, drag and drop a GridView and SqlDataSource control. Attach the GridView with the SqlDataSource control, the way we have shown the link above.
After you have run the website, you will see the GridView showing details of employees in tabular format. We have selected four columns from Employee Details table.
GridView Edit (Update) Row
To edit data in a particular row, add AutoGenerateEditButton and set DataKeyNames="EmpID" to the GridView control. The DataKeyNames field will be used in the SQL query to edit the employee details.

This will add an Edit link button at the beginning of all the rows in the GridView. Clicking the link button will trigger a PostBack to the server requesting to edit the row values.
As I have mentioned earlier, the GridView shows four columns and I want to edit selected columns only, let’s say, the Mobile Number and Email Address.
Therefore, first set ReadOnly="true" for the fields "EmpID" and "EmpName".

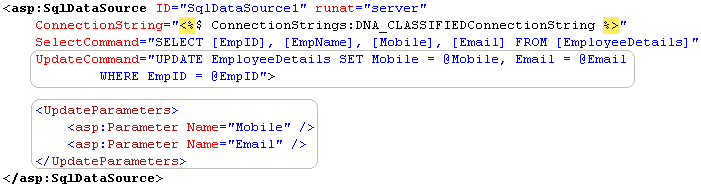
In <asp:SqlDataSource />, add the UpdateCommand property, which will have an SQL Update command or a procedure to update the selected row’s data. Add two parameters (or fields) inside <UpdateParameters> property.
Delete a GridView Row
Similar procedure must be followed to delete one row at a time. Just add AutoGenerateDeleteButton="true" in the GridView control. In the SqlDataSource add the below property and parameter.
DeleteCommand="DELETE FROM EmployeeDetails WHERE EmpID = @EmpID">

<DeleteParameters>
    <asp:Parameter Name="EmpD"/>
</DeleteParameters>
That’s it. There is hardly any code to be written to do these transactions. All we need is to write the SQL queries according to our need. However, there is a "drawback" when deleting a particular row. If a user clicks the "delete" button, the page will post back the delete command and the query is executed, which deletes the entire row. (Without any warning). It can be very disturbing if the row was mistakenly deleted. The lost data cannot come back.
To cease these mistakes from happening, we need a confirmation (yes or no) before deleting any row in the GridView. To accomplish this, set AutoGenerateDeleteButton="false" or remove it entirely.
Delete a GridView Row with a Confirmation
In the Column section of the GridView we will add <asp:LinkButton /> control, which will have a client script (Confirm). It will show a popup confirmation message and allows the user to either go with the delete command or negate it.
<Columns>
    <asp:TemplateField>
        <ItemTemplate>
        <asp:LinkButton Runat="server"
            OnClientClick="return confirm('Are you sure you?');"
            CommandName="Delete">Delete</asp:LinkButton>
        </ItemTemplate>
    </asp:TemplateField>
</Columns>
<html>
<head>
    <title>GridView Edit and Delete Row</title>
</head>
<body>
    <form id="form1" runat="server">
    <div>
        <asp:GridView
            ID="GridView1" Font-Names="Arial" Font-Size="Smaller"
            AutoGenerateColumns="False"
            AutoGenerateEditButton="True"
            AutoGenerateDeleteButton="False"
            DataSourceID="SqlDataSource1"
            DataKeyNames="EmpID"
            runat="server">

            <Columns>
                <asp:TemplateField>
                    <ItemTemplate>
                        <%--ADD THE DELETE LINK BUTTON--%>
                        <asp:LinkButton Runat="server"
                            OnClientClick ="return confirm('Are you sure you?');"
                            CommandName="Delete">Delete</asp:LinkButton>
                    </ItemTemplate>
                </asp:TemplateField>

                <%--DATA BOUND COLUMNS--%>
                <asp:BoundField DataField="EmpID" HeaderText="EmpID"
                    SortExpression="EmpID" ReadOnly="true" />
                <asp:BoundField DataField="EmpName" HeaderText="EmpName"
                    SortExpression="EmpName" ReadOnly="true" />
                <asp:BoundField DataField="Mobile" HeaderText="Mobile"
                    SortExpression="Mobile" />
                <asp:BoundField DataField="Email" HeaderText="Email"
                    SortExpression="Email" />
            </Columns>
        </asp:GridView>

        <%--THE SQL DATA SOURCE CONNECTED WITH THE GRIDVIEW--%>
        <asp:SqlDataSource
            ID="SqlDataSource1" runat="server"
            ConnectionString="<%$ ConnectionStrings:DNA_CLASSIFIEDConnectionString %>"
            SelectCommand="SELECT [EmpID], [EmpName], [Mobile], [Email] FROM [EmployeeDetails]"
            UpdateCommand="UPDATE EmployeeDetails SET Mobile = @Mobile, Email = @Email
                WHERE EmpID = @EmpID"
            DeleteCommand="DELETE FROM EmployeeDetails WHERE EmpID = @EmpID">

            <UpdateParameters>
                <asp:Parameter Name="Mobile" />
                <asp:Parameter Name="Email" />
            </UpdateParameters>

            <DeleteParameters>
                <asp:Parameter Name="EmpD" />
            </DeleteParameters>

        </asp:SqlDataSource>
    </div>
    </form>
</body>
</html>
Before running this site on your local host, check if the web.config file has been configured properly. To check the file go to Solution Explorer and choose the web.config file. Inside the file, find <connectionStrings> tag and check if the connection string is properly set. (UserID, Password etc.)
<connectionStrings>
    <add name="DNA_ConnectionString" connectionString="Data Source=dna;
        Initial Catalog=DNA_CLASSIFIED;Integrated Security=True"
            providerName="System.Data.SqlClient"/>
</connectionStrings>