
Last updated: 17th January 2025
Crystal Reports is a powerful tool for designing reports within the .NET framework. In this comprehensive guide, I will provide step-by-step instructions on how to integrate Crystal Reports into your ASP.NET project, complete with report navigation options.
To begin with, I'll first create an employee table and add few rows in it. The Crystal Report needs data, and we will fetch the data from this table.
CREATE TABLE Employee
    (EmpID INT NOT NULL ,
        EmpName VARCHAR(50) NOT NULL,
	    Designation VARCHAR(50) NULL,
        Department VARCHAR(50) NULL,
        JoiningDate DATETIME NULL,
	    CONSTRAINT [PK_Employee] PRIMARY KEY CLUSTERED (EmpID)
    )
Instead, use our dummy database to create more tables with rows.
Add more data in the Employee table. Say around 50 rows. It is always good to have lot of data to test data centric applications and reports. Also, create tables like “List of Passengers”, “Friends List” etc.
How to add Crystal report in your Asp.Net Project?
Start visual studio. From the File menu, select New -> Web Site -> Choose ASP.NET Web Site and click OK. Choose the language you are comfirtable with. However, we are using both C# and Vb in this article.
In this example, I'll use an HTML Panel control, and add the Crystal Report to it. The panel control will have 5 “Buttons” and a “DropDown” control. The dropdown control will have a list of printers, extracted from the local machine. The buttons are for printing and navigating the report.
<!DOCTYPE html>
<html>
<head>
    <title>Add Crystal Report in Asp.Net</title>
    <style>
        <%--STYLE IT--%>
        .button
        {
            text-align: center;
            color: #fff;
            font-weight: normal;
            background-color: #6D9BF1;
            border: solid 1px #3079ED;
            border-radius: 2px; -moz-border-radius:2px; -webkit-border-radius:2px;
	        line-height: 15px;
	        padding: 3px 2px;
	    }
        .button:hover
        {
            background-color: #4876FF;
            cursor: pointer;
        }
        .panRep
        {
            border:solid 1px #93A0AA;
            background-color:#FFF;
            position:absolute;
            text-align:center;
            top:50px;
            left:10px;
        }
        .divprint
        {
            font:15px Arial;
            padding:10px;
        }
        .dropdown
        {
            text-align:center;
            color:#333;
            padding:2px;
            font:13px Arial;
        }
    </style>
</head>

<body>
    <form id="form1" runat="server">
        <asp:Panel ID="panReport" runat="server" CssClass="panRep" Visible="false">

            <div class="divprint" style="float:left">
                Select a Printer:  <asp:DropDownList ID="ddlPrinters" CssClass="dropdown"
                    runat="server"></asp:DropDownList>
                <asp:Button id="btPrintRep" CssClass="button" ToolTip="Print"
                    Text="Print" runat="server" />
            </div>

            <div class="divprint" style="float:left">
                Navigators:
                <asp:Button ID="btFirstPage" ToolTip="First Page" Text="<<" runat="server" />
                <asp:Button ID="btNextPage" ToolTip="Next Page" Text=">" runat="server" />
               <asp:Button ID="btPrevPage" ToolTip="Previous Page" Text="<" runat="server" />
                <asp:Button ID="btLastPage" ToolTip="Last Page" Text=">>" runat="server" />
            </div>
        </asp:Panel>
    </form>
</body>
</html>
Once the HTML part is done add a folder named Reports in the root directory. (See the below image.)

Now follow these steps to add a Crystal Report in your project.
01) Right click the reports folder in the Solution Explorer, and select Add New Item…
02) In the "Template" list, select Crystal Report. Set the name of report as "Employee.rpt" and click Add. You can choose your desired "Language".
03) Visual studio will open Crystal Reports Gallery window. In that choose "As a Blank Report" option. (We’ll design the report). Click the OK button.
You will also need to add few crystal report references.
a) CrystalDecisions.CrystalReports.Engine
b) CrystalDecisions.Web
c) CrystalDecisions.Shared
To add the above references, select Website menu from the top menu list, and select Add Reference. In the .NET tab, find and select the above mentioned components and click the “OK” button.
To confirm your selection of the above references, right click the Project in the Solution Explorer window and select Property Pages. It will show you the list of References in your project.
Create a DataSet
We need a DataSet which will create an XML schema. In addition, the DataSet (with the extention .xsd), will have the columns required to design the report.
To create the DataSet, right click the reports folder in the Solution Explorer window and click Add New Item…. Select DATASET from the list of TEMPLATES and name it as Employee.xsd and click OK.
Add a DataTable
Right click the DataSet (Employee.xsd file) and select Add -> DataTable

Add Columns in your DataTable
The columns you will add in your DataTable will be the columns in the Crystal Report. So, right click on the "DataTable in the DataSet" and add columns. Repeat the process one by one until we have added all the columns.
Note: The column names should match with columns in your SQL Query.

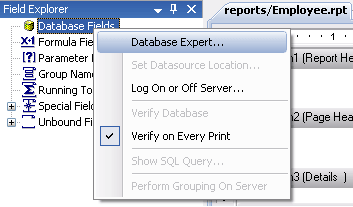
Add Employee.xsd to Employee.rpt (Crystal Report file)
Open “Employee.rpt” and in the “Field Explorer” window, right click “Database Fields”, and select “Database Expert”.
Choose Create New Connection and select ADO.NET in the Database Expert window.

In the File Path option, choose the Employee.xsd file and click the Finish button. It will finally ask you to add the select tables. See the image below.

Once you click the OK button, the Employee table will be added under Database Fields in the Crystal Report Field Explorer window. Add the columns by dragging them in the Main Report section of the report. Design the report according to your requirement and save it.
The image below, shows the final layout of the report

Finally, we have designed our report. Now we will write the code to call the report from our application along with the code for navigating the report.
using System;
using System.Data;
using System.Data.SqlClient;
using System.Web.UI.WebControls;

public partial class _Default : System.Web.UI.Page
{
    // DECLARE THE "REPORT" AND "REPORT VIEWER" OBJECT.
    CrystalDecisions.CrystalReports.Engine.ReportDocument Report =
        new CrystalDecisions.CrystalReports.Engine.ReportDocument();
    CrystalDecisions.Web.CrystalReportViewer CrystalReportViewer =
        new CrystalDecisions.Web.CrystalReportViewer();

    protected void Page_Load(object sender, EventArgs e)
    {
        if (!IsPostBack) {
            // ADD THE LIST PRINTERS IN THE DROPDOWN CONTROL.
            foreach  (String printer in
                    System.Drawing.Printing.PrinterSettings.InstalledPrinters)
            {
                ddlPrinters.Items.Add(printer);
            }

            LoadData();
        }
    }
    private void LoadData()
    {
        // CALL "ShowReport()" FUNCTION.
        ShowReport("SELECT *FROM dbo.Employee", "Employee.rpt", "Employee", panReport);
    }

    private Boolean ShowReport(String sQuery, String rptFileName, String sTableName,
        Panel panReport)
    {
        using (SqlConnection conn = new SqlConnection("Data Source=dna;
                Persist Security Info=False;" +
               "Initial Catalog=DNA_CLASSIFIED;User Id=sa;Password=demo;
                Connect Timeout=30;"))
        {
            System.Data.SqlClient.SqlDataAdapter objDataAdapter =
                new System.Data.SqlClient.SqlDataAdapter (sQuery, conn);
            DataSet obj_ds = new DataSet();

            // SET TIMEOUT PERIOD, SINCE THE ENTIRE PROCESS IS ONLINE. MIGHT TAKE SOME TIME.
            objDataAdapter.SelectCommand.CommandTimeout = 500;
            objDataAdapter.Fill(obj_ds, sTableName);

            // LOAD THE REPORT.
            Report.Load(System.AppDomain.CurrentDomain.BaseDirectory + "reports\\" +
                    rptFileName + "");
            Report.SetDataSource(obj_ds);       // SET REPORT DATA SOURCE.

            CrystalReportViewer.BorderStyle = BorderStyle.None;
            CrystalReportViewer.DisplayGroupTree = false;
            CrystalReportViewer.DisplayToolbar = false;     // DON'T DISPLAY TOOL BAR.
            CrystalReportViewer.Zoom(150);                  // ZOOM FACTOR 150%.
            CrystalReportViewer.BestFitPage = false;
            CrystalReportViewer.HasCrystalLogo = false;
            CrystalReportViewer.Width = 1180;
            CrystalReportViewer.Height = 700;
            CrystalReportViewer.ReportSource = Report;

            // FINALLY, ADD THE VIEWER WITH A PANEL CONTROL ON THE PAGE.
            panReport.Controls.Add(CrystalReportViewer);
            panReport.Visible = true;

            return true;
        }
    }
    ' NAVIGATORS (FIRST PAGE, NEXT PAGE, PREVIOUS PAGE AND LAST PAGE)
    ' NOTE:  TO SEE THIS CONTROLS IN ACTION, ADD MORE DATA IN THE "EMPLOYEE" TABLE.
    protected void btFirstPage_Click(object sender, EventArgs e)
    {
        LoadData();
        CrystalReportViewer.ShowFirstPage();
    }
    protected void btNextPage_Click(object sender, EventArgs e)
    {
        LoadData();
        CrystalReportViewer.ShowNextPage();
    }
    protected void btPrevPage_Click(object sender, EventArgs e)
    {
        LoadData();
        CrystalReportViewer.ShowPreviousPage();
    }
    protected void btLastPage_Click(object sender, EventArgs e)
    {
        LoadData();
        CrystalReportViewer.ShowLastPage();
    }
}
Option Explicit On
Imports System.Data
Imports System.Data.SqlClient

Partial Class _Default
    Inherits System.Web.UI.Page

    ' DECLARE THE "REPORT" AND "REPORT VIEWER" OBJECT.
    Protected Report As CrystalDecisions.CrystalReports.Engine.ReportDocument = _
        New CrystalDecisions.CrystalReports.Engine.ReportDocument
    Protected CrystalReportViewer As CrystalDecisions.Web.CrystalReportViewer = _
        New CrystalDecisions.Web.CrystalReportViewer

    Protected Sub form1_Load(ByVal sender As Object, ByVal e As System.EventArgs) Handles form1.Load
        If Not Page.IsPostBack Then
            ' ADD THE LIST PRINTERS IN THE DROPDOWN CONTROL. (OPTIONAL)
            For Each printer As String In System.Drawing.Printing.PrinterSettings.InstalledPrinters
                ddlPrinters.Items.Add(printer)
            Next printer

            LoadData()
        End If
    End Sub

    Private Sub LoadData()
        ' CALL "ShowReport()" FUNCTION.
        ShowReport("SELECT *FROM dbo.Employee", "Employee.rpt", "Employee", panReport)
    End Sub

    ' BIND THE REPORT WITH THE DATABASE TABLE AND SHOW IT.
    Private Function ShowReport(ByVal sQuery As String, ByVal rptFileName As String, _
        ByVal sTableName As String, ByRef panReport As Panel) As Boolean

        Try
            Using conn = New SqlConnection("Data Source=dna;Persist Security Info=False;" & _
                "Initial Catalog=DNA_CLASSIFIED;User Id=sa;Password=demo;Connect Timeout=30;")

                Dim objDataAdapter As New System.Data.SqlClient.SqlDataAdapter _
                    (sQuery, conn)
                Dim obj_ds As New DataSet

                ' SET TIMEOUT PERIOD, SINCE THE ENTIRE PROCESS IS ONLINE. MIGHT TAKE SOME TIME.
                objDataAdapter.SelectCommand.CommandTimeout = 500
                objDataAdapter.Fill(obj_ds, sTableName)

                ' LOAD THE REPORT.
                Report.Load(System.AppDomain.CurrentDomain.BaseDirectory() & _
                    "reports\" & rptFileName & "")
                Report.SetDataSource(obj_ds)                        ' SET REPORT DATA SOURCE.

                CrystalReportViewer.BorderStyle = BorderStyle.None
                CrystalReportViewer.DisplayGroupTree = False
                CrystalReportViewer.DisplayToolbar = False          ' DON'T DISPLAY TOOL BAR.
                CrystalReportViewer.Zoom(150)                       ' ZOOM FACTOR 150%.
                CrystalReportViewer.BestFitPage = False
                CrystalReportViewer.HasCrystalLogo = False
                CrystalReportViewer.Width = "1180"
                CrystalReportViewer.Height = "770"
                CrystalReportViewer.ReportSource = Report

                ' FINALLY, ADD THE VIEWER WITH A PANEL CONTROL ON THE PAGE.
                panReport.Controls.Add(CrystalReportViewer)
                panReport.Visible = True

                ShowReport = True
            End Using
        Catch ex As Exception
            ShowReport = False
        Finally
        End Try
    End Function

    ' NAVIGATORS (FIRST PAGE, NEXT PAGE, PREVIOUS PAGE AND LAST PAGE)
    ' NOTE:  TO SEE THIS CONTROLS IN ACTION, ADD MORE DATA IN THE "EMPLOYEE" TABLE.
    Protected Sub btFirstPage_Click(ByVal sender As Object, ByVal e As System.EventArgs) _
            Handles btFirstPage.Click
        LoadData()
        CrystalReportViewer.ShowFirstPage()
    End Sub

    Protected Sub btNextPage_Click(ByVal sender As Object, ByVal e As System.EventArgs) _
            Handles btNextPage.Click
        LoadData()
        CrystalReportViewer.ShowNextPage()
    End Sub

    Protected Sub btPrevPage_Click(ByVal sender As Object, ByVal e As System.EventArgs) _
            Handles btPrevPage.Click
        LoadData()
        CrystalReportViewer.ShowPreviousPage()
    End Sub

    Protected Sub btLastPage_Click(ByVal sender As Object, ByVal e As System.EventArgs) _
            Handles btLastPage.Click
        LoadData()
        CrystalReportViewer.ShowLastPage()
    End Sub
End Class
In the "form1_Load" event we will add the list of printers (Optional) in a DropDown control. This works fine on the “localhost” using a LAN connection. We suggest you convert crystal reports into ".pdf" files, if working on the web, since these printers will not be available.
The "LoadData()" procedure calls ShowReport() function which accepts 4 parameters.
01) SQL query that will fetch the data from Employee table.
02) The report file ("Employee.rpt") that will be displayed.
03) The name of the "Table" for the DateSet in the function.
04) The "ID" of the "Panel" control, used to display the report on the web page.